Saturday, July 20, 2013

Eldar - Dire Avengers Painted

Had a surprisingly free Saturday for a change, and I was able to take advantage of the relatively cool morning to finish off the Dire Avengers!


I took a couple pictures, but the white-background ones completely blew out the white on the models. So back to the old-school picture style (which to be honest I prefer)! Painting all the little gems was a chore, I found that on average each one had about 25. Oof!

I've started laying down the base colors on the Warp Spiders, but nothing worth taking pictures of. I'm hoping to have them finished by the end of the weekend though!

Friday, July 19, 2013

Eldar - Dire Avengers painting in process

Popped home for lunch and snapped a quick pic of the Dire Avengers in process while I had some good light. I went with a brighter blue than the Guardians to help differentiate them as an aspect warrior unit rather than just another Alaitoc squad.


Still quite a bit of highlighting, detailing and basing to do of course, and I'm considering how I ought to finish of the helmet crests - I'm torn between leaving them solid yellow as-is, or perhaps adding some black (or possibly red) stripes to them as shown in the codex. Thoughts? Once these are done I think it'll be time to bite the bullet and start in on the Warp Spiders - definitely time to do something other than blue and yellow!

Thursday, July 18, 2013

Imperial Guard - Leviathan Command Carrier painting begins!

Summer is fully upon us and it's been pushing 100F day after day - which has made the hobby loft a thoroughly miserable place. However, we had a brief respite and I took advantage for a few hours over the weekend. I was getting a little tired of painting Eldar and thought I'd switch gears a little before jumping back in for the big push to finish off the pointy-eared gits. With Apocalypse being released recently, there was really on one thing I could paint... The Leviathan! My buddy Dave suggested that I give craft paints a go on the Leviathan as there was going to be so much paint needed to cover the beast, and he gave me several bottles to try. Time to break out the BIG brush!


Now obviously this is just the start of blocking in the colors and there are many, many more coats to go before it's anywhere near done - craft paints are way more translucent than I'm used to so what is usually three coats of paint is going to have to be six or more before it stops looking streaky. However, blocking in the main areas definitely helps the monster come into focus as a model. I'll admit that I'm not totally happy with the build - suffice it to say I learned a lot about what doesn't work, but that's mostly because I aimed well outside my current skill level. Can't get better if you don't push the envelope from time to time though! That said, it's not bad either - I won't feel embarrassed putting it on the table. The plan is to take it down to Feast of Blades to participate in the narrative Apocalypse event, along with a couple other suitably Apocalyptic units. Should be a (apocalyptic mega) blast!

Thursday, July 11, 2013

Eldar - The army so far...

Just a quick post today - Couple folks have asked for a group shot of the Eldar, so I laid them out in roughly the same setup as the painting chart and snapped a pic over my lunchbreak today while I had some relatively decent light:


It's definitely a colorful army! I have gotten the basic blue laid down on the Dire Avengers, I'm trying to ensure they are done up in a different style/shade of blue from the earlier Guardians - a little lighter, and done in a wash-over-white primer style similar to the Fire Dragons and Striking Scorpions. I dabbled with the Warp Spiders but didn't like the 'brown recluse' scheme so they'll likely get a bath in Simple Green and start anew soon!

Tuesday, July 9, 2013

Eldar - Crimson Hunter Painted

Braved the heat up in the hobby loft to finish up the Crimson Hunter after work today. All in all I decided to keep it simple, and let the red fade take center stage on the model. It is called a Crimson Hunter, after all! The leather brown from earlier acted as the base for the bone colored panels, weapons and engines.


The canopy got the same treatment as the rest of the vehicles in the army to help tie it all together. On the other hand, the red gems that I've been adding to all the predominantly blue vehicles wouldn't really work against the red on the flyer, so I went with blue gems instead - sort of a reversal of the Alaitoc scheme!


All in all a rather fun model to build and paint - it was amusing to paint an Eldar model in what was essentially the same paint scheme as my old Dark Eldar army! There's not really a whole lot left to paint in the army at this point:


A couple aspect warrior squads, a unit of Wraithblades and a mess o' characters. I'm saving the characters for last, and I think knocking out the Dire Avengers will be next, just to churn through the largest remaining unit. I'm hoping to have the army done in time to put it up on the auction block prior to GenCon, and raise a little extra spending money for the trip!

Monday, July 8, 2013

Eldar - Crimson Hunter painting in progress

It was a nice long 4th of July weekend here stateside and it was jam packed with fun stuff! Couple barbeques, a gig with the band, a game of 40k (for which my buddy Dave has done a great write-up) and some painting time. I had gotten a little tired of painting blue and yellow, so I thought it may be time for some red! I'd put together a Crimson Hunter Exarch taking build cues from the excellent Todd Sherman over at SincaiN40k - I'm not a big fan of the top forward fins that GW suggests, so the Hemlock tailfin was added instead. Definitely a better look!


I started off by laying down a base coat of Dark Fleshtone, and then started doing some drybrushing on the leading edges with Red Gore, Blood Red and Hot Orange, trying to blend them together to make a nice gradient. Once that was done, I hit it with a Carroburg Crimson wash to tie it all together and mute it down a little.


After that, I started picking out the various panels and engines in black and leather (which is the basecoat that the bone color will be built on. So far so good! I'm still sorting through pictures from the game on the 5th, turns out I didn't have the anti-shaky-cam on and a LOT of my pics were blurred to the point of uselessness. Curses!

Wednesday, July 3, 2013

Battle Reports - 4th (5th) of July Battle, 2013

My buddy Dave over at Ex Fide Vivo and I usually throw down for a game of 40k over the 4th of July weekend each year, though in this case it'll actually be on the 5th due to some commitments with the band. I spent some time setting up the table and pulling out the army, and figured I'd snap a few pre-game pics!


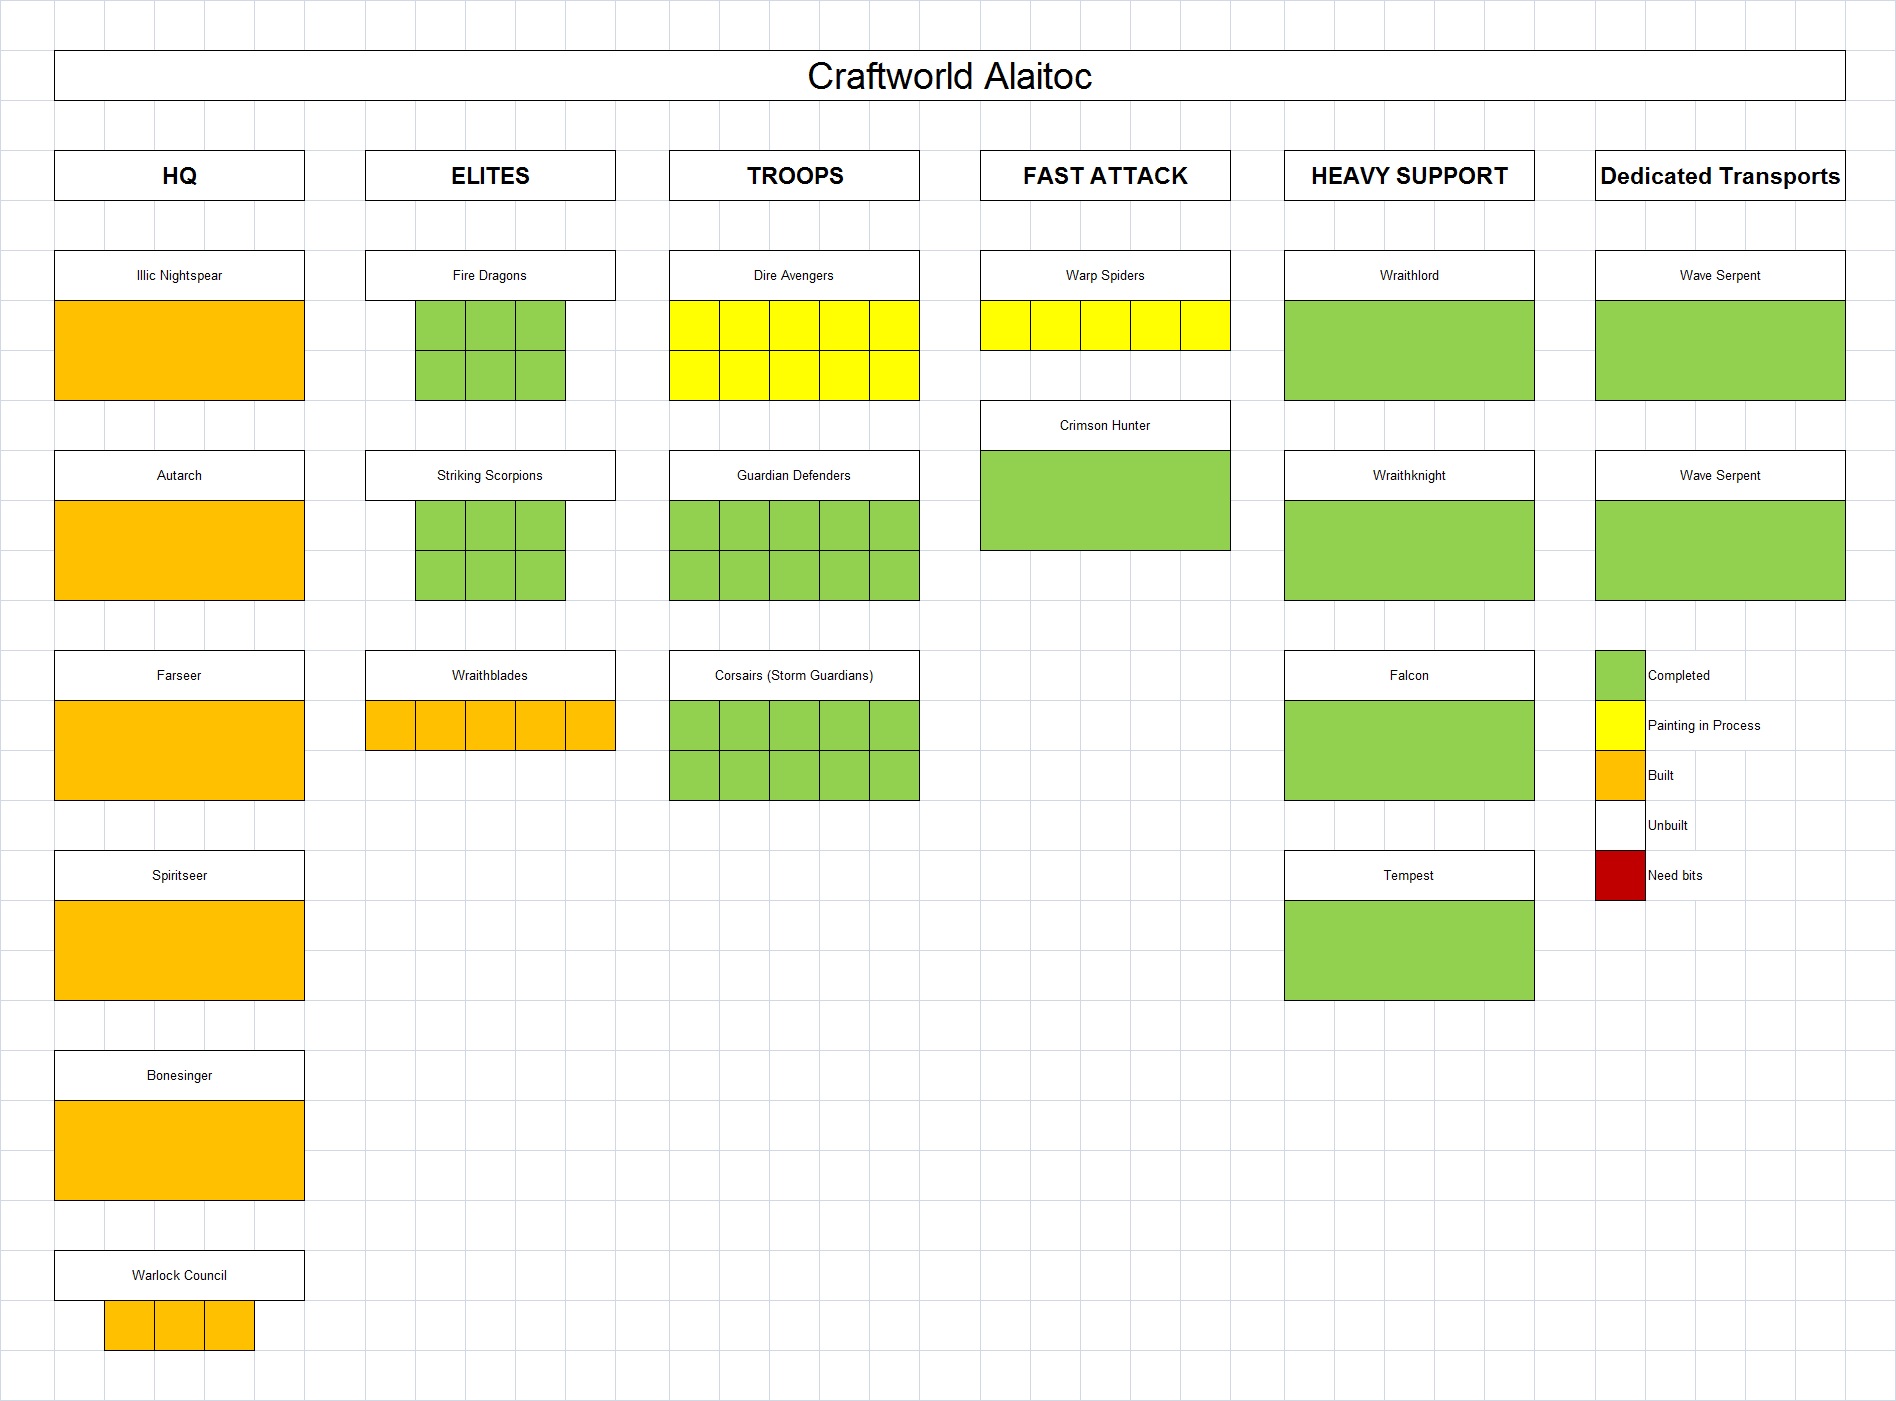
Here's the 2000 point Eldar army I'll be fielding:

HQ
Farseer
Wraithseer
2 Warlocks (1 w/Singing Spear, 1 w/Witchblade)

Troops
10 Dire Avengers
10 Guardian Defenders
10 Corsairs (Storm Guardians)
5 Wraithblades

Elites
6 Firedragons w/ Exarch
6 Striking Scorpions w/Exarch

Fast Attack
1 Crimson Hunter Exarch

Heavy Support
1 Wraithknight
1 Falcon (Scatter Laser, Pulse Laser)

Dedicated Transports
2 Wave Serpents (1 w/Brightlances, 1 w/Starcannons)

1994 points

Dave is bringing his Blood Angels, so I fully expect to be carved into little chunks in short order. No better than the poncy, pointy-eared gits deserve, I suppose! Heh.


Surprising absolutely no one, I opted for an urban themed table. When I lay out a table for a game, I usually go diagonally, it helps give the impression that the battlefield extends off in every direction. It also helps to break up sight lines across the table moreso than a perpendicularly arranged layout would. One of the tenets that I follow is "start old and build up" which means I'll place terrain in the following order: Rivers > Hills > Roads > Buildings. In a future post where I'll actually have all those terrain types on the table I'll do a more thorough explanation, but suffice it to say I started off by laying out a grid of roads after which I laid out the buildings. I'll usually put the largest/tallest buildings in the center of the table, then work outward from there using smaller and smaller pieces. After that I'll start putting in the ground clutter/visual fluff - at the moment I've just done a few craters, but there will be fencing and vehicles and barricades and such by the time we kick off!


A shot from the other side of the table also gives a view into the churning mass of hobby stuff that's in various stages of done-ness, while the Closet of Doom looms just off to the left out of frame. I do like having a nice open airy room to work on hobby stuff three seasons out of the year, but it certainly does get murderously hot up there in the summertime. We're planning on kicking off around 8-9am to try and get done before the temperature soars and all our miniatures melt! I don't plan on doing a full-blown battle report, but there will be pics to follow - since Dave's army is completely painted and mine is nearly so, there should be some cool shots (of me getting my butt kicked)!