

First thing was to scour the interwebs for some images of the World Eaters heresy era symbol - the one above seemed appropriate. Now I know my fine detail painting skills aren't quite up to the level of fidelity achieved in the picture above, so I simplified it somewhat, and took the advice of a friend of mine to alter the number of teeth in the top jaw as otherwise the teeth don't interlock as we felt they should.
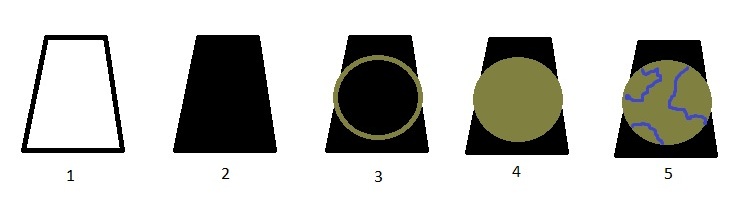
Now bear in mind the steps listed are illustrated rather ham-handedly in MSPaint, but that makes for a decent replication of what I'm capable of with a paint brush when it comes to free-hand work. Steps 1 and 2 are drawing and filling in a trapezoid (or truncated cone) in black to form the backdrop against which the symbol is painted. Similarly a Camo Green circle is painted into the center of the trapezoid and filled in, such that it bulges out slightly from the sides of the trapezoid. After that, a series of squiggles are painted on using Enchanted Blue to form the basis of the continents on the planet.
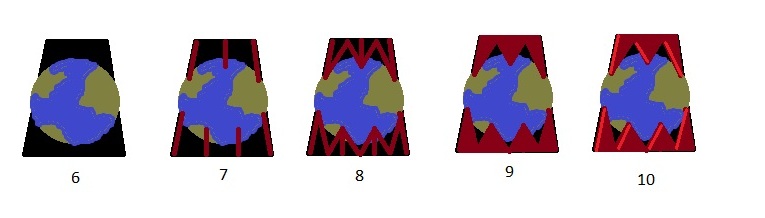
Next, the blue is filled in to form the oceans. Step 7 is the beginning of the tooth pattern - Red Gore is used to draw the outside fangs (sloping to match the outline of the trapezoid), and a line is drawn straight up and down to form the points of the triangular teeth - One in the middle on the top, and two evenly spaced along the bottom, overlapping the planet somewhat. Steps 8 and 9 are connecting the points, and filling in the resultant triangles. Finally in step 10 the leading edges of the teeth are picked out in Blood Red to give it a little sense of depth. Note that I'll generally leave a little of the black trapezoid showing underneath the whole symbol, as that helps it 'pop' a little from the shoulder pad or greave that it is painted against.
Fairly simple, and I've utilized this method on the first test model which I finished this evening. Hopefully I can get some pictures of it in decent light over the next couple days to show how it works!


.jpg)


Now, just the small matter of taking this design and painting it onto a space not much bigger than 1/4 inch which also happens to curve over 2 planes... : )
ReplyDeleteJoking aside this looks really good and I really like how you've broken down the steps. It'll still be fairly involved to paint but you've boiled it down to a process so all the guesswork is gone.
theunrealisticartist
Indeed! That's exactly why I tried to simplify the design as much as possible - the real trick I've found has been to get the right proportions on the trapezoid. Once that's sorted out, the rest of the symbol goes on fairly easy.
ReplyDelete...Of course, I'm committing myself to painting this thing over 100 times when all is said and done (50+ minis, 1-2 per mini, plus vehicles). Oof.
Spectacular! This is exactly what I talk about in my posts when it comes to freehand and you'v done it perfectly.
ReplyDeleteI can tell you that once you do a few of them, you will get very fast at it and it will take you no time at all. And... you'll be surprised at how similar all of them are as well.
Excellent work!
Ron, From the Warp
Thanks Ron! It looks like a lot of steps but really it does go fairly quickly. Actually I found the Thousand Sons symbol was a bit more fiddly to paint since it's all tiny circles and wavy lines. I'm finding this one a bit easier to paint consistently, even though it's 5 colors rather than 2... I'm sure after the 50th or so I'll have it down pat. Hah!
ReplyDeleteHey :) Have you thought about sculpting the symbol into it's most basic form, the jaws and circle, then pressing in indentation lines to delineate the landmasses in the circle? Then you could grab Blu Stuff, mold them, and crank them out. Then you'd have raised symbols that could be easier to paint. I say this based on Ron's most recent article on FTW about the Minotaurs symbol, actually :)
ReplyDeleteNot that your freehand plan won't turn out great looking results, mind you, I'm just offering an alternative :)
Still, the thought of having o freehand this on god knows how many models seems daunting. (through sheer quantity alone never mind the complexity of the design). Have you considered trying to sculpt the pads... Rons tips for this are great! and you can use his tips for making moulds and casting up copies of your sculpt. It will mean that all of the icons will have identical proportions... something which can be very hard to achieve otherwise (and not to mention of the double curved shoulder pads!
ReplyDeleteDefinitely a good point, guys. I did spend some time reading through his posts, and I'm definitely planning on doing the small run blu-stuff molding a try soon. That said, I'd just be exchanging one modelling challenge for another - the thought of casting 60+ shoulder pads is more daunting than the thought of painting. Besides, the practice afforded from undertaking the painting task will help make me a better painter.
ReplyDelete...That, or give me tendonitis. One of the two.