Monday, October 22, 2012
The Praetorian Project - Leviathan Greenstuffed
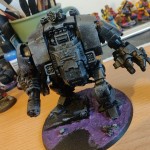
...Have you ever gotten towards the end of a project and felt as though you've taken a bad mis-step? I definitely have, and here is that point with the Leviathan. Due to my ham fisted-ness there were numerous areas with gaps that I figured "hey, I'll be able to fix that with a little GS before primering", but it was only once I sat down and started gap filling that I realized that A) there were a lot more gaps than I thought, and B) I really should have been gap filling as I went along rather than waiting until it was all assembled.
I'll be the first to admit that my GS skills are sorely lacking, mostly relegated to gap filling and hair/fur, but the sheer size of the Leviathan introduced an entirely new set of issues. Primarily, how to hold the darn thing while applying the GS, and secondarily not breaking/bending/cracking anything while trying to smooth it all out. There were more than a few ominous creaks and cracks during this process, and to my horror, the rear right rounded tread section broke loose and I was forced to make an emergency repair.
I used a mix of knead-together and liquid greenstuff - the knead together was used to fill in the larger holes, while the liquid was used on the minor areas and to help smooth transitions between the plastic and the kneaded GS areas. Going to have to primer it to see how it actually worked - after which I'll more than likely need to do another pass with the GS to clean up any egregious areas. Oof!
Labels:
Conversion,
Leviathan,
Mordian 7th,
Praetorians
Subscribe to:
Post Comments (Atom)

.JPG)


.JPG)


Great work as always.
ReplyDeleteI wouldn't worry about the GS issues too much, I'm sure it'll be ok once the paint is on.
For future modeling try using something besides GS; as you've found it's too stiff to work on unstable surfaces. There are plenty of softer alternatives out there, my current favorite is White Putty by Squadron Tools.
Prime, fill, sand. Prime, fill, sand. Prime fill, sand. Ugh. So much tideous work ahead - but it will be worth it. It's looking great.
ReplyDeleteLooking good. This project really is coming along well!!!
ReplyDeleteThanks folks!
ReplyDelete@Cornu Mortem - Interesting. I'll have to check it out! Seems like omething in between the consistencies of GS and LGS would be ideal.
@Zab - Indeed, I was thinking I was nearing the end of the build phase, but I fear there's quite a bit more to do. Oof.
@AJ - I appreciate it!
Keep at it and don't despair. The hardest part is mostly done. From here, there are NO gaps!
ReplyDeleteso case closed, you're done and the deal is sold. As your lawyer, I advise you move on to painting.
:P
adding to what others have suggested I like 'Das' modelling clay for those situations.
ReplyDeleteI think it is looking awesome, Top stuff!
Definitely feeling your pain there, mate! Don't worry, though: I've found rough spots on vehicles to actually be an advantage in the past: Once painted, those areas will look like welded joints and crude field repairs rather than GS accidents. The hug, plain areas on your Leviathan can use some additional texture, too ;-)
ReplyDeleteSo don't worry, it'll look cool in the end! And the sheer scope of this project is of course staggering! Great job!
I appreciate the kind words, folks!
ReplyDelete@Dai - Hah! I'm going to give it a hit of primer today and see how it looks. Hopefully I've managed to catch the worst of the gaps.
@Col. Ackland - I'll check it out, thanks!
@KrautScientist - Good call on painting up any rough areas as welds and field expedient repairs, turn a weakness into a strength!
Don't hesitate to make those rough areas centered for weathering and battle damage in addition to welds and field repairs. Something this large only looked like it rolled off the forge world once, you know?
ReplyDeleteKeep it coming, man