Saturday, April 28, 2012

Out with the old, in with the new?

Unfortunately the Thousand Sons didn't sell as a complete army, which isn't totally surprising - it's tough to drop the cash for an entire army all at once. That said, I've broken the army up into individual units and some small lots (that logically fit together in their own battlefoam trays).


On other Heresy-era fronts, I worked on a couple test bits for the World Eater Terminators - the torsos are still winging their way from Russia, but the legs and arms will be coming from the loyalist Assault Terminator kit. I'm going to be utilizing only the legs with the full greave (as opposed to the ones with the separate knee pad), and adding some rivets that I picked up from the Tichy Train Group to the left legs. I picked up an assortment of different sizes - These are .050" diameter, and seem to be just about the right scale for infantry models.


I'm also planning to have the Terminators armed with big Chain Axes which will be counts-as Lightning Claws (it looks like could force a failed to-wound re-roll!). The regular troopers will have the singe axehead style, while the sergeant will get the double bladed version to help him stand out in the unit.


Another set of models originally built for the Thousand Sons has been re-purposed for the World Eaters, in the form of the Dreadclaw-inspired Drop Pods. I cleaned them up and gave them a re-primer and started blocking in the colors on the first of two:


Unlike the previous Land Raiders (on which I had some fairly patchy results), I'm going to re-basecoat anything that is going to be blue with black first rather than painting the blue directly onto the white. The Drop Pods are also going to have a fair bit of weathering done to them, going to try out some of the heat scorching ideas I've gleaned from around the blogosphere. Should be fun!

Friday, April 27, 2012

Heresy Era World Eaters - Battle Company Captain painted

Next model done - The Captain of the 7th Cohort, 3rd (Battle) Company. There's a half dozen old metal armor marks banging around in the Closet of Doom, so while I wait for the FW order to arrive I thought I'd do another test model.


I'm finding that not only is White difficult to paint, it's also somewhat difficult to photograph. My usual tricks for white balancing the pictures seem to blow out the whites on the miniatures, so still some experimentation to go there. Tried out a little sponge weathering here and there, though he didn't get any blood spatter as yet. I'm holding off for now on this one - at the moment I'm only planning to do that on the chain weapons in the army.


Need to go a bit more extreme on the highlights on the infantry I think, going to be trying a tone darker with the grey washes used to lowlight the armor and see if that helps. So far so good, though!

Thursday, April 26, 2012

Heresy Era World Eaters - More Land Raider progress

Made a start at the weathering for the Land Raiders, and cleaning up the patchy blue. From here on out, for the vehicles I'm definitely going to be starting with a black basecoat under the blue, rather than attempting to paint the blue directly over the white. Sheesh.


Added a bit more battle damage to the tanks overall, utilizing the sponge and stipple method, then went in with some washes and tried my hand at oil and mud streaks around the rivets. After that I tried some of the new textured paints GW have come out with, primarily along the lower hull, and along the track sections.


"Goliath" is painted to match up (mostly) the artwork from the Visions of Heresy novel. I slipped a bit with the brush and got more mud down the right rear side of the tank, but in retrospect I think it works, and the whole edging along the track rollers could use a bit more mud spatter on both sides of the tank. It's all very experimental at the moment!


"Blade of Fury" is a bit more subdued, mud-wise. Overall I'm happy with how they are coming along, though there's still more work to be done! Bit the bullet and made the first Forge World order for some infantry and a Storm Eagle, really looking forward to getting stuck in on that kit!


Sunday, April 22, 2012

And the winner is...

Just got back from a nice getaway weekend, and I was floored by all the kind words upon my return - I really appreciate it, everyone! It's humbling (and a little scary) to know that all of you are out there enjoying the decent into madness that is my hobby! Thank you all once again for all the support and feedback you've given over the years!

That said, before I call it a night I broke out a set of polyhedral random number generators, consulted the Emperor's Tarot and the Storm Raven goes to...

Tristan M! 


Tristan, I wasn't able to find a contact email on your profile, so please contact me at moonlight (at) cold-moon.com and we'll get you sorted out!

I have some more World Eaters coming your way in the next day or two - stay tuned!

Friday, April 20, 2012

The "250th Post, and 4 Years" milestone giveaway!

Holy cow! I just took a gander at my post history and this is post #250. Not only that, but as of yesterday, I've been banging away at the blog for 4 years. FOUR YEARS?! How does that happen? I want to send all my readers a huge THANK YOU for all the support, comments, and constructive criticism you've given me over the years, and as a token of my appreciation, I delved into the Closet of Doom to come up with something to use for the reward for a giveaway contest! How does a brand spanking new Stormraven sound?


As part of the planning for the Heresy-Era World Eaters, I'd picked up a Stormraven kit that I was going to use for conversion fodder to make a Stormhawk. Of course, not but two weeks later, Forge World announced their Storm Eagle, and suddenly the kit I'd picked up became superfluous. So, here's the plan - 1) if you're a follower of my blog, and 2) you post a comment on this post, on Sunday night (4/22/12) I'll randomly pick out one of you fine folks and send you a brand new, on the sprue Stormraven kit (sans shrinkwrap though, as I had opened it to ensure everything was intact and correct)!

Once again, a tremendous thank you to all of you who have followed along on my meanderings through the blogosphere, and I hope to provide you with many more years of hobby goodness!

Cheers all!

Joel
Mordian7th

Wednesday, April 18, 2012

Adeptus Mechanicus - Warhound Titan painted

One of the spoils I brought back from foreign lands was a Warhound titan - Although I'm not sure if I saved on shipping based on the cost of the plane ticket... Hmm.  In any case, one of the wonderful Fugitives was kind enough to set me up with a custom upper carapace with a resin Machina Opus on it, and I couldn't wait to get started painting. ...And there it sat in a half-finished state for the last month and a half. But no longer!


I'd decided to go with Legio Metallica, as the Gold and Red with Black & White hazard stripes ties in well with the intended scheme for the upcoming Ad-Mech revival army. Some pretty minor conversion work on the rest of the model to add some banner hangers and so forth.


I took a crack at weathering the loincloth banner, and it turned out all right. It was only after the fact that I realized I hadn't trimmed the ragged edge into the banner, but it's going to be pretty tough to trim it now. Ah well. I added the Adeptus Titanicus symbol to the right leg and painted on a scroll with some High Gothic (read as: terrible Google mistranslation) nominally reading "Ride The Lightning". Har! I was exceedingly pleased with the effect on the silhouette the updated carapace gives, it feels a little sleeker without the big spikes. It's definitely a challenge painting something on this scale - now that it's in 'showroom condition' I'm considering going the weathering route on it. I think I'll hold off until I get some more practice in with the World Eaters, however.

In any case, rather pleased with how it's turned out. Now it will sadly just go into a battlefoam tray and not see the tabletop until well after 6th ed comes along. Or 7th, based on how our last apocalypse game was almost 3 years ago... Sigh.

Sunday, April 15, 2012

Heresy Era World Eaters - Angron painted

I had a free evening on Friday and decided that I'd keep right on going with Angron. I also am trying out some new lightbox techniques, which I think helps to capture the right colors and tones.


While the Heresy era World Eaters livery is white and blue, most of the artwork for Angron shows him in red and gold so I tried to stay true to that. Most of the pictures show him with a red triangular tattoo across his forehead and scalp which I attempted to mimic, and I also painted in a few wires from his temples back to a little device on the back of his neck to represent the various psycho-surgeries and aggression amplifiers.


Similarly, along his temple and across his back I painted some scars. It seemed that Angon would bear some lash marks from his time as a gladiator. The axe head of God Tearer and his loincloth got the white treatment to tie him in with the rest of the army, and I added a few extra little flashes of color with the melta bomb and grenades.


Angron towers over our stalwart guardsman, as is only fitting! I also snapped a picture using my old method, and I'm torn. The overall balance and focus is definitely much better with the faux lightbox, but I do like the depths and scale that having the terrain provides...

Friday, April 13, 2012

Heresy Era World Eaters - Angron build complete

All the bits finally arrived to build the Angriest Ron (as opposed to our own Ron from FTW), so I cobbled together all the parts into one hulking monstrosity!


In the Tempus Fugitives codex, Angron is armed with either his pair of chainaxes Gorefather and Gorechild, or his single two-handed axe Godtearer. I settled on the latter, using some bits from the Ork Nobs' Big Choppas.


He's also armed with a master crafted Plasma Pistol as well as Frag Grenades and a Melta Bomb, so I ensured that I added them to the model as well. Wherever possible I try to make my models WYSIWYG, as that helps remind me what they're armed with on the tabletop as well!


My buddy Dave gave me some jeweler's chain to add a little flavor to the model (and to hide a couple unsightly gaps). All in all I'm well pleased with how he turned out - compared to a guardsman he's sufficiently massive to represent the Primarch of the World Eaters. I'm definitely looking forward to getting some paint on him!

Tuesday, April 10, 2012

Heresy Era World Eaters - Land Raiders painting in progress, part 2

A little more forward motion on the Heresy-era World Eaters Land Raiders - got all the metal areas blacked in, the Boltgun metal applied and a nice black wash over it, bringing the color down to a nice dark iron look.


I also started working on the weathering here and there, mostly on the lower/leading edges of the armor where the paint would logically be rubbed away. Definitely kept it a bit more subdued than I did on the Contemptor earlier, and I'm thinking this may have been too much in the other direction. In looking at the pics I realized I have yet to go in and clean up the transition areas between white and blue as well... Gotta get on that.


Based on Rictus' suggestion, I went with painting the inner hull on the second Land Raider in blue, leaving just the outside hull section in white, which I think worked pretty well. Unfortunately the blue I used went on a little patchy over the white undercoat, so I need to go in and smooth that out a bit here and there as well.


Lastly I went in and started adding in some of the iconography and numbers to the tanks. The "7" for the 7th Company, and the World Eaters symbol on the side doors. Definitely getting the hang of painting the symbol now, and I'm fairly pleased with how they are turning out. At this size I think I need to go in and add a bit more highlighting to the continents...

Monday, April 9, 2012

Heresy Era World Eaters - Land Raiders painting in progress, part 1

Got a little more work done on the Land Raiders, finished doing the final highlights on the white and started blocking in the blues.


The first Land Raider got the blue paint scheme shown in the previous post, after which I went in and blocked in al the parts that will be metal in black. Looking at the pics, I do need to go back in and clean up a few areas where the blue and white meet as well.


On the second Land Raider I went with the track housings in blue with the main hull in white, though I don't think this provides enough blue on the model. Two options occur: 1) Paint the side hull sections in blue as well, leaving the door, sponson plate and access hatch in white, or 2) the reverse, paint the door, sponson plate and access hatch in blue. What do you think, folks?

Saturday, April 7, 2012

Heresy Era World Eaters - Land Raiders Built

The World Eaters army I have planned fields a pair of Land Raiders, mostly because I got a great deal on a pair of 'em on eBay a few months back. The pair of Mk. 1's had been soaking in Simple Green and finally came out, so I set about repairing and rebuilding them where necessary. Once that was done I took them out and gave them their first passes with the three-stage primer method I'm experimenting with:


This time around I kept the original lascannons that came with the kit, though I replaced the brittle and fiddly plastic arm with a length of brass rod and a little wad of greenstuff down inside the mount to really make it solid. The Lascannons always take the brunt of the bumps and scrapes, so the brass rod should be far more durable. Only one of the Land Raiders came with the original Heavy Bolters, so I swapped them out with the sponson Heavy Bolters from a Baneblade kit - the ammo feeds matched up almost perfectly with the grooves in the top hatch. Providence!

I'm going to paint up one of the tanks in the paint scheme shown in the art above, while on the second one I plan to paint the main tread housings in blue and leave the center hull and protruding parts of the side hull in white. Definitely looking forward to getting stuck in with the paints!

While I was at the hobby shop earlier in the week I picked up a couple pots of the new texture paints GW have come out with, and plan to experiment with them in the weathering process once the 'factory fresh' paint scheme is completed. Looks to be fun stuff to work with!

Friday, April 6, 2012

Terrain project - Command trench

While waiting for parts and pieces to arrive for the World Eaters, I switched gears and knocked out a piece of terrain that's been lurking unpainted in the Closet of Doom for some time.


A while back I'd run across an alternate resin titan head that was rather reminiscent of the new epic Warlord, and since it was relatively inexpensive I'd picked up a couple of them. The small trench-works terrain piece has been sitting unused for about the same amount of time, so it only made sense to combine the two. I was envisioning the head being used as a command post, and the trenches were built up around it after the loss of the titan.


Went with a green color scheme for the titan as that seems to be the default color that GW paints them, and the trench works were done in a series of various browns, boltgun metal and black and brown washes. A couple tufts of static grass here and there and job done!

...Not that I really needed more terrain, but heck, it was there and needed to be painted!

Tuesday, April 3, 2012

Heresy Era World Eaters - First Test Model!

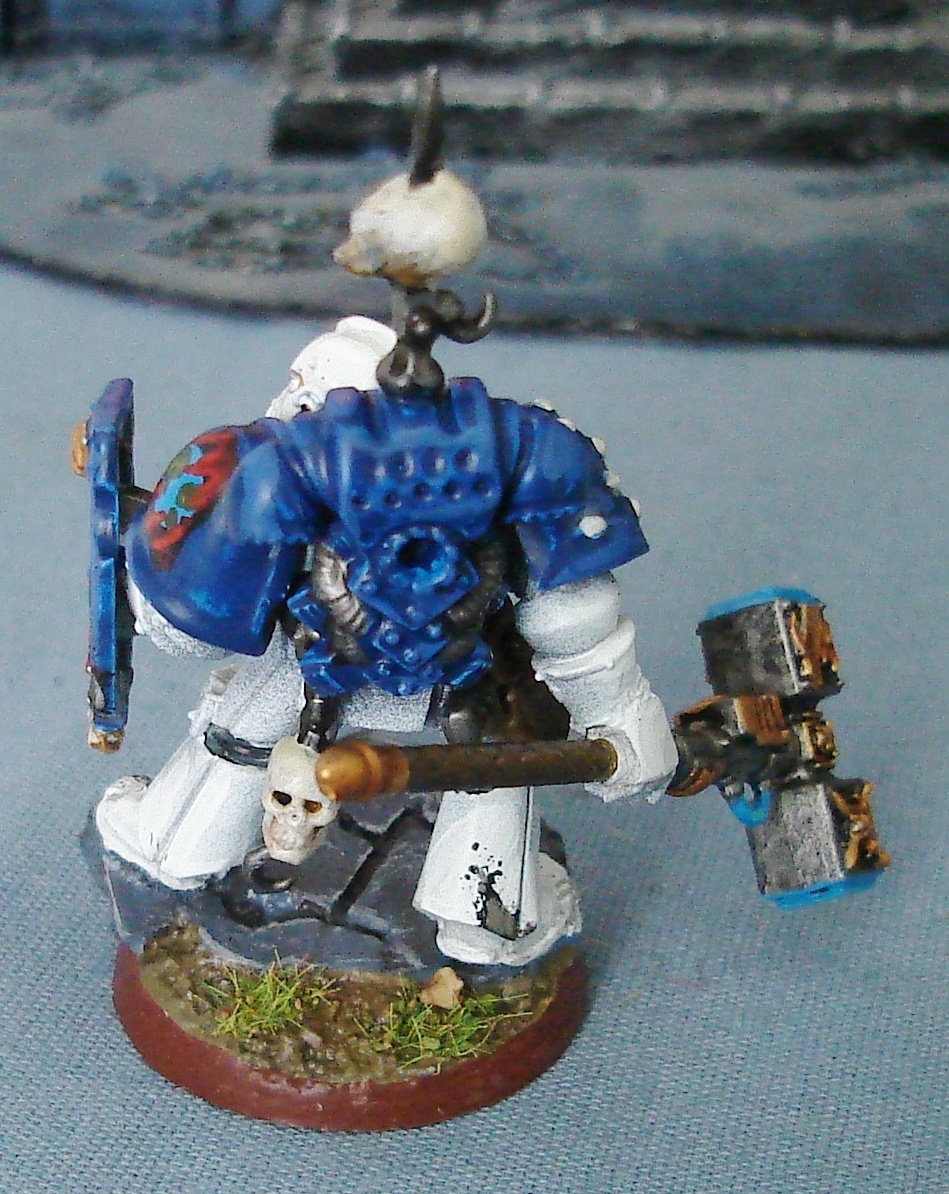
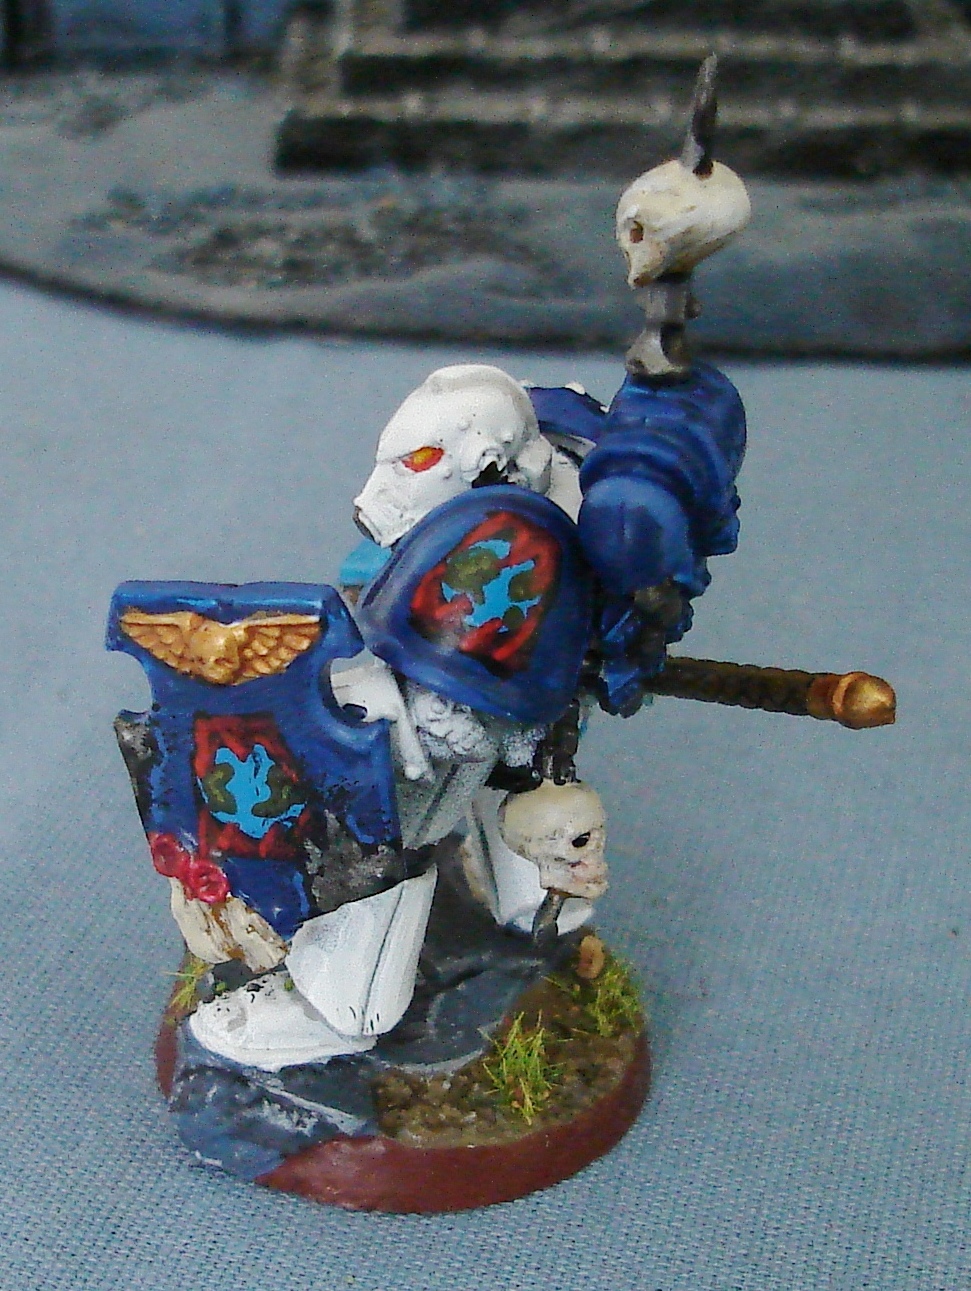
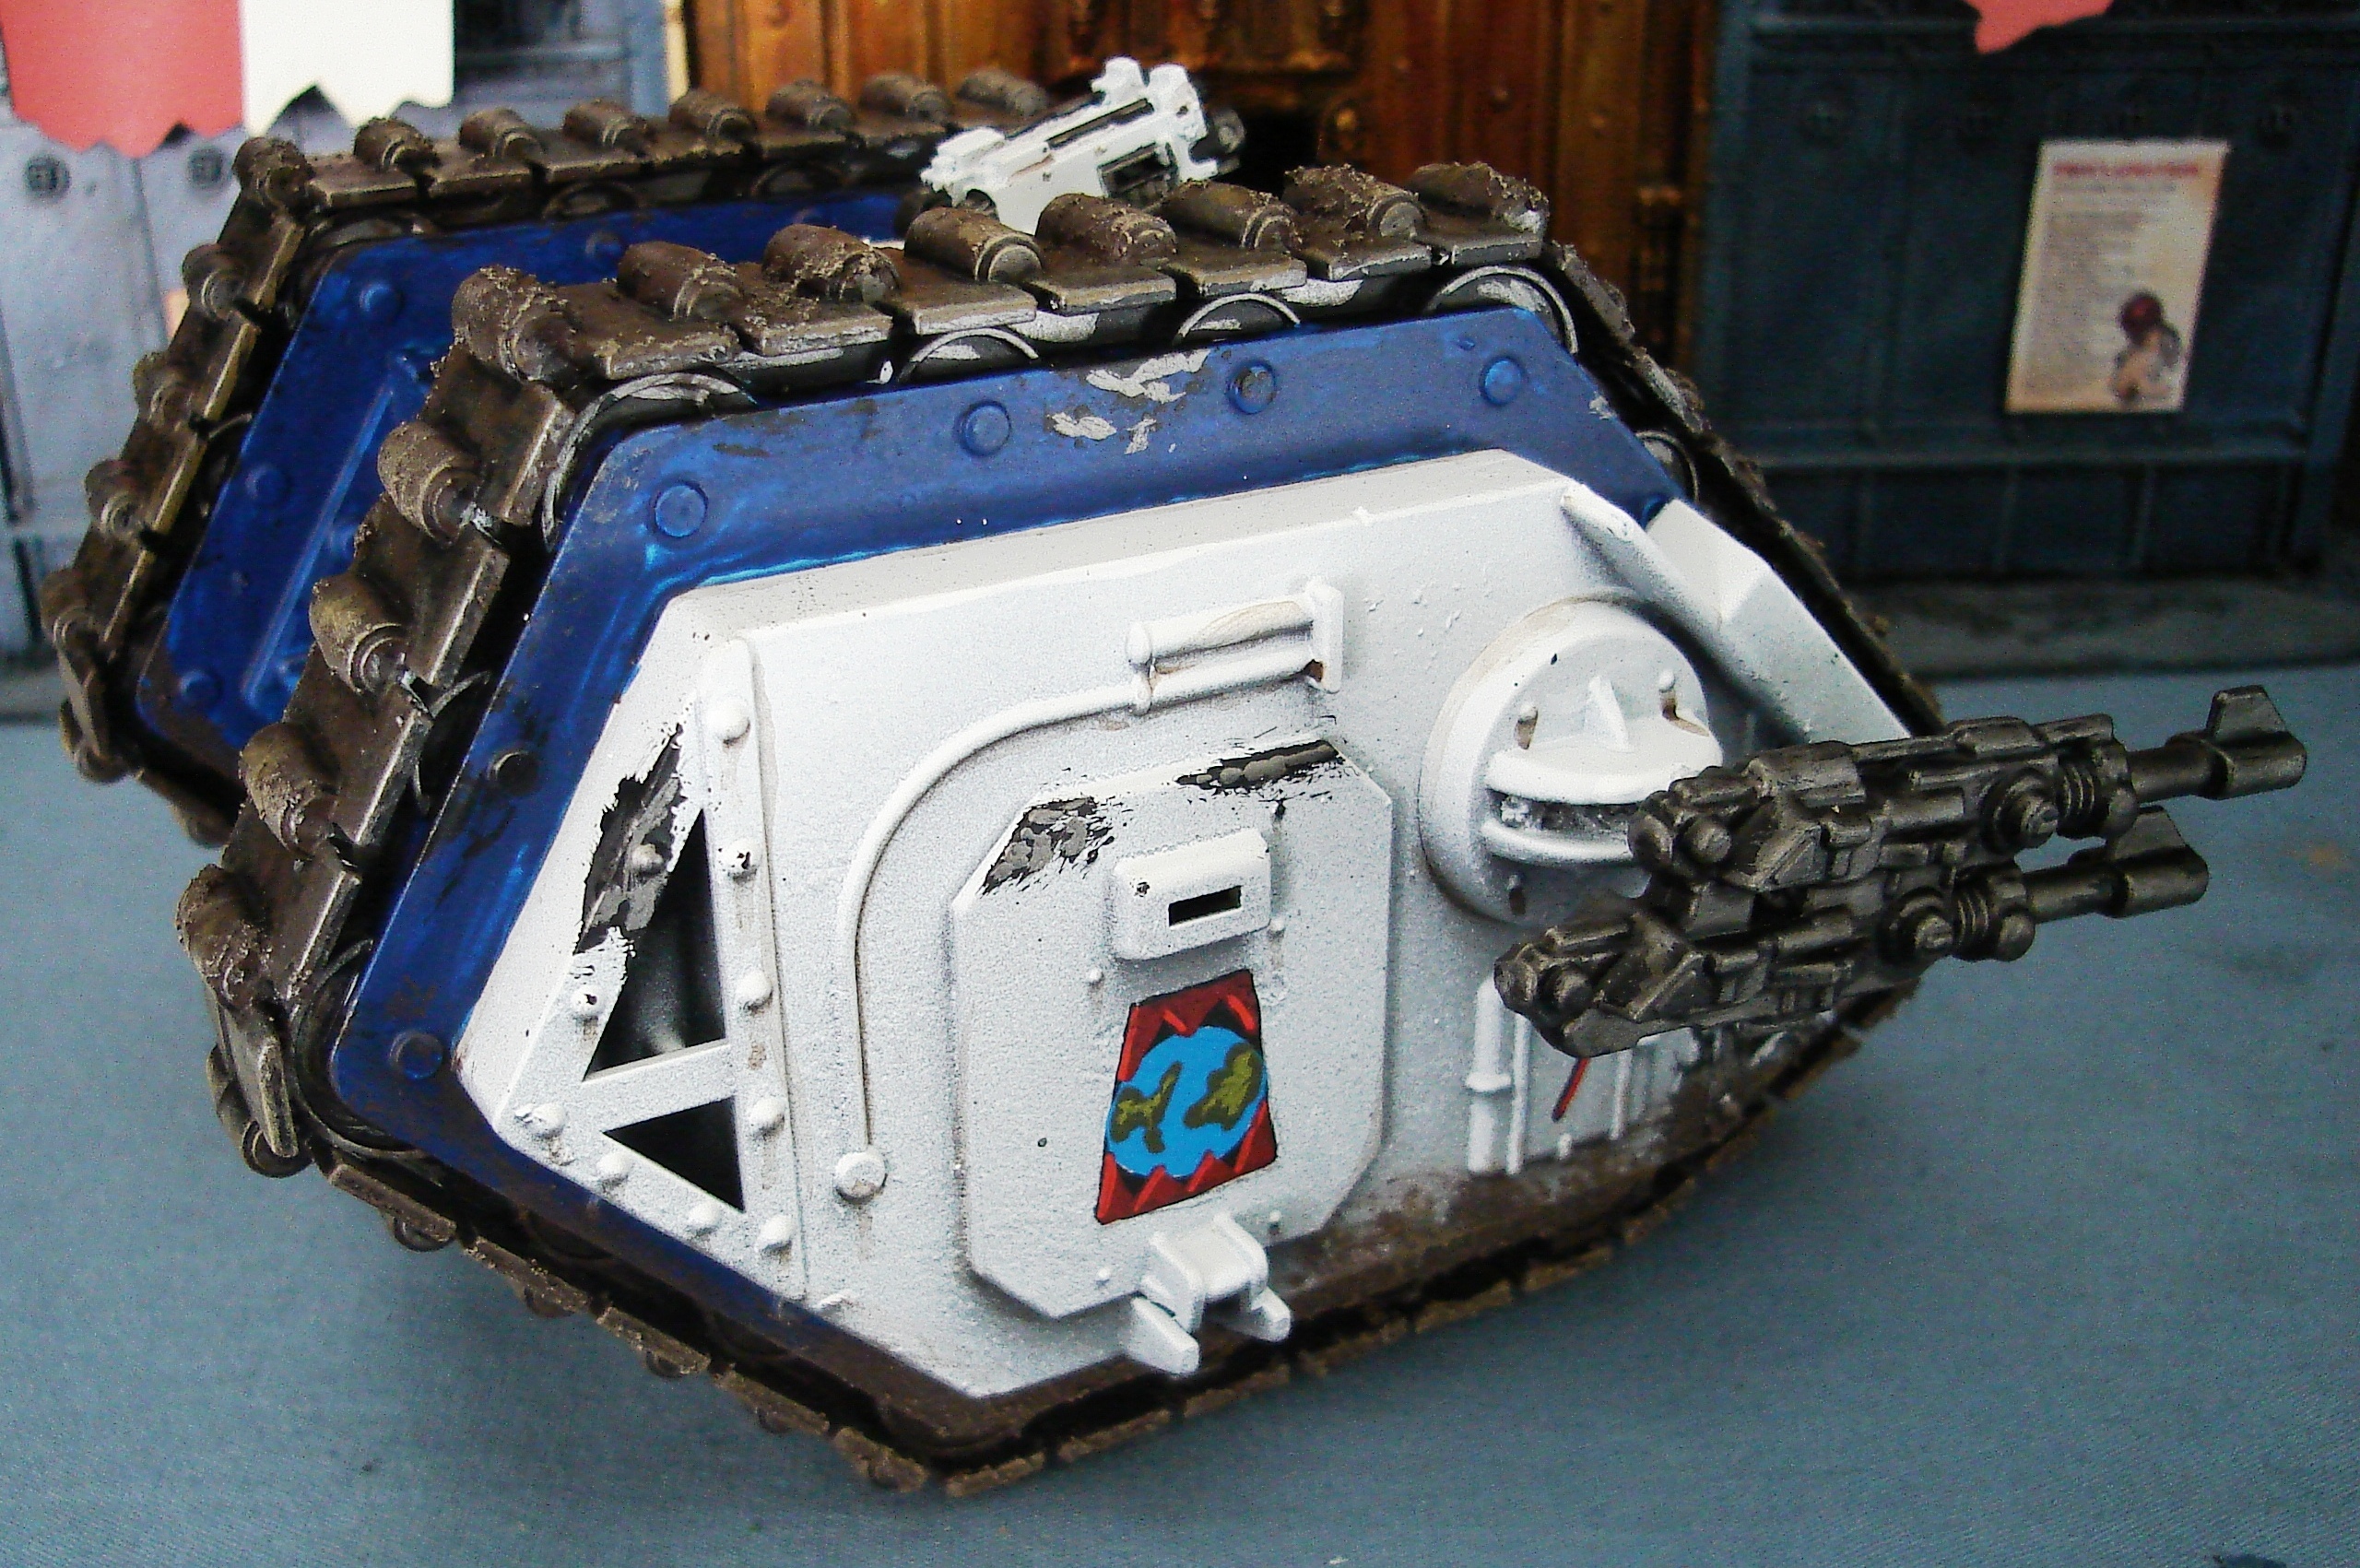
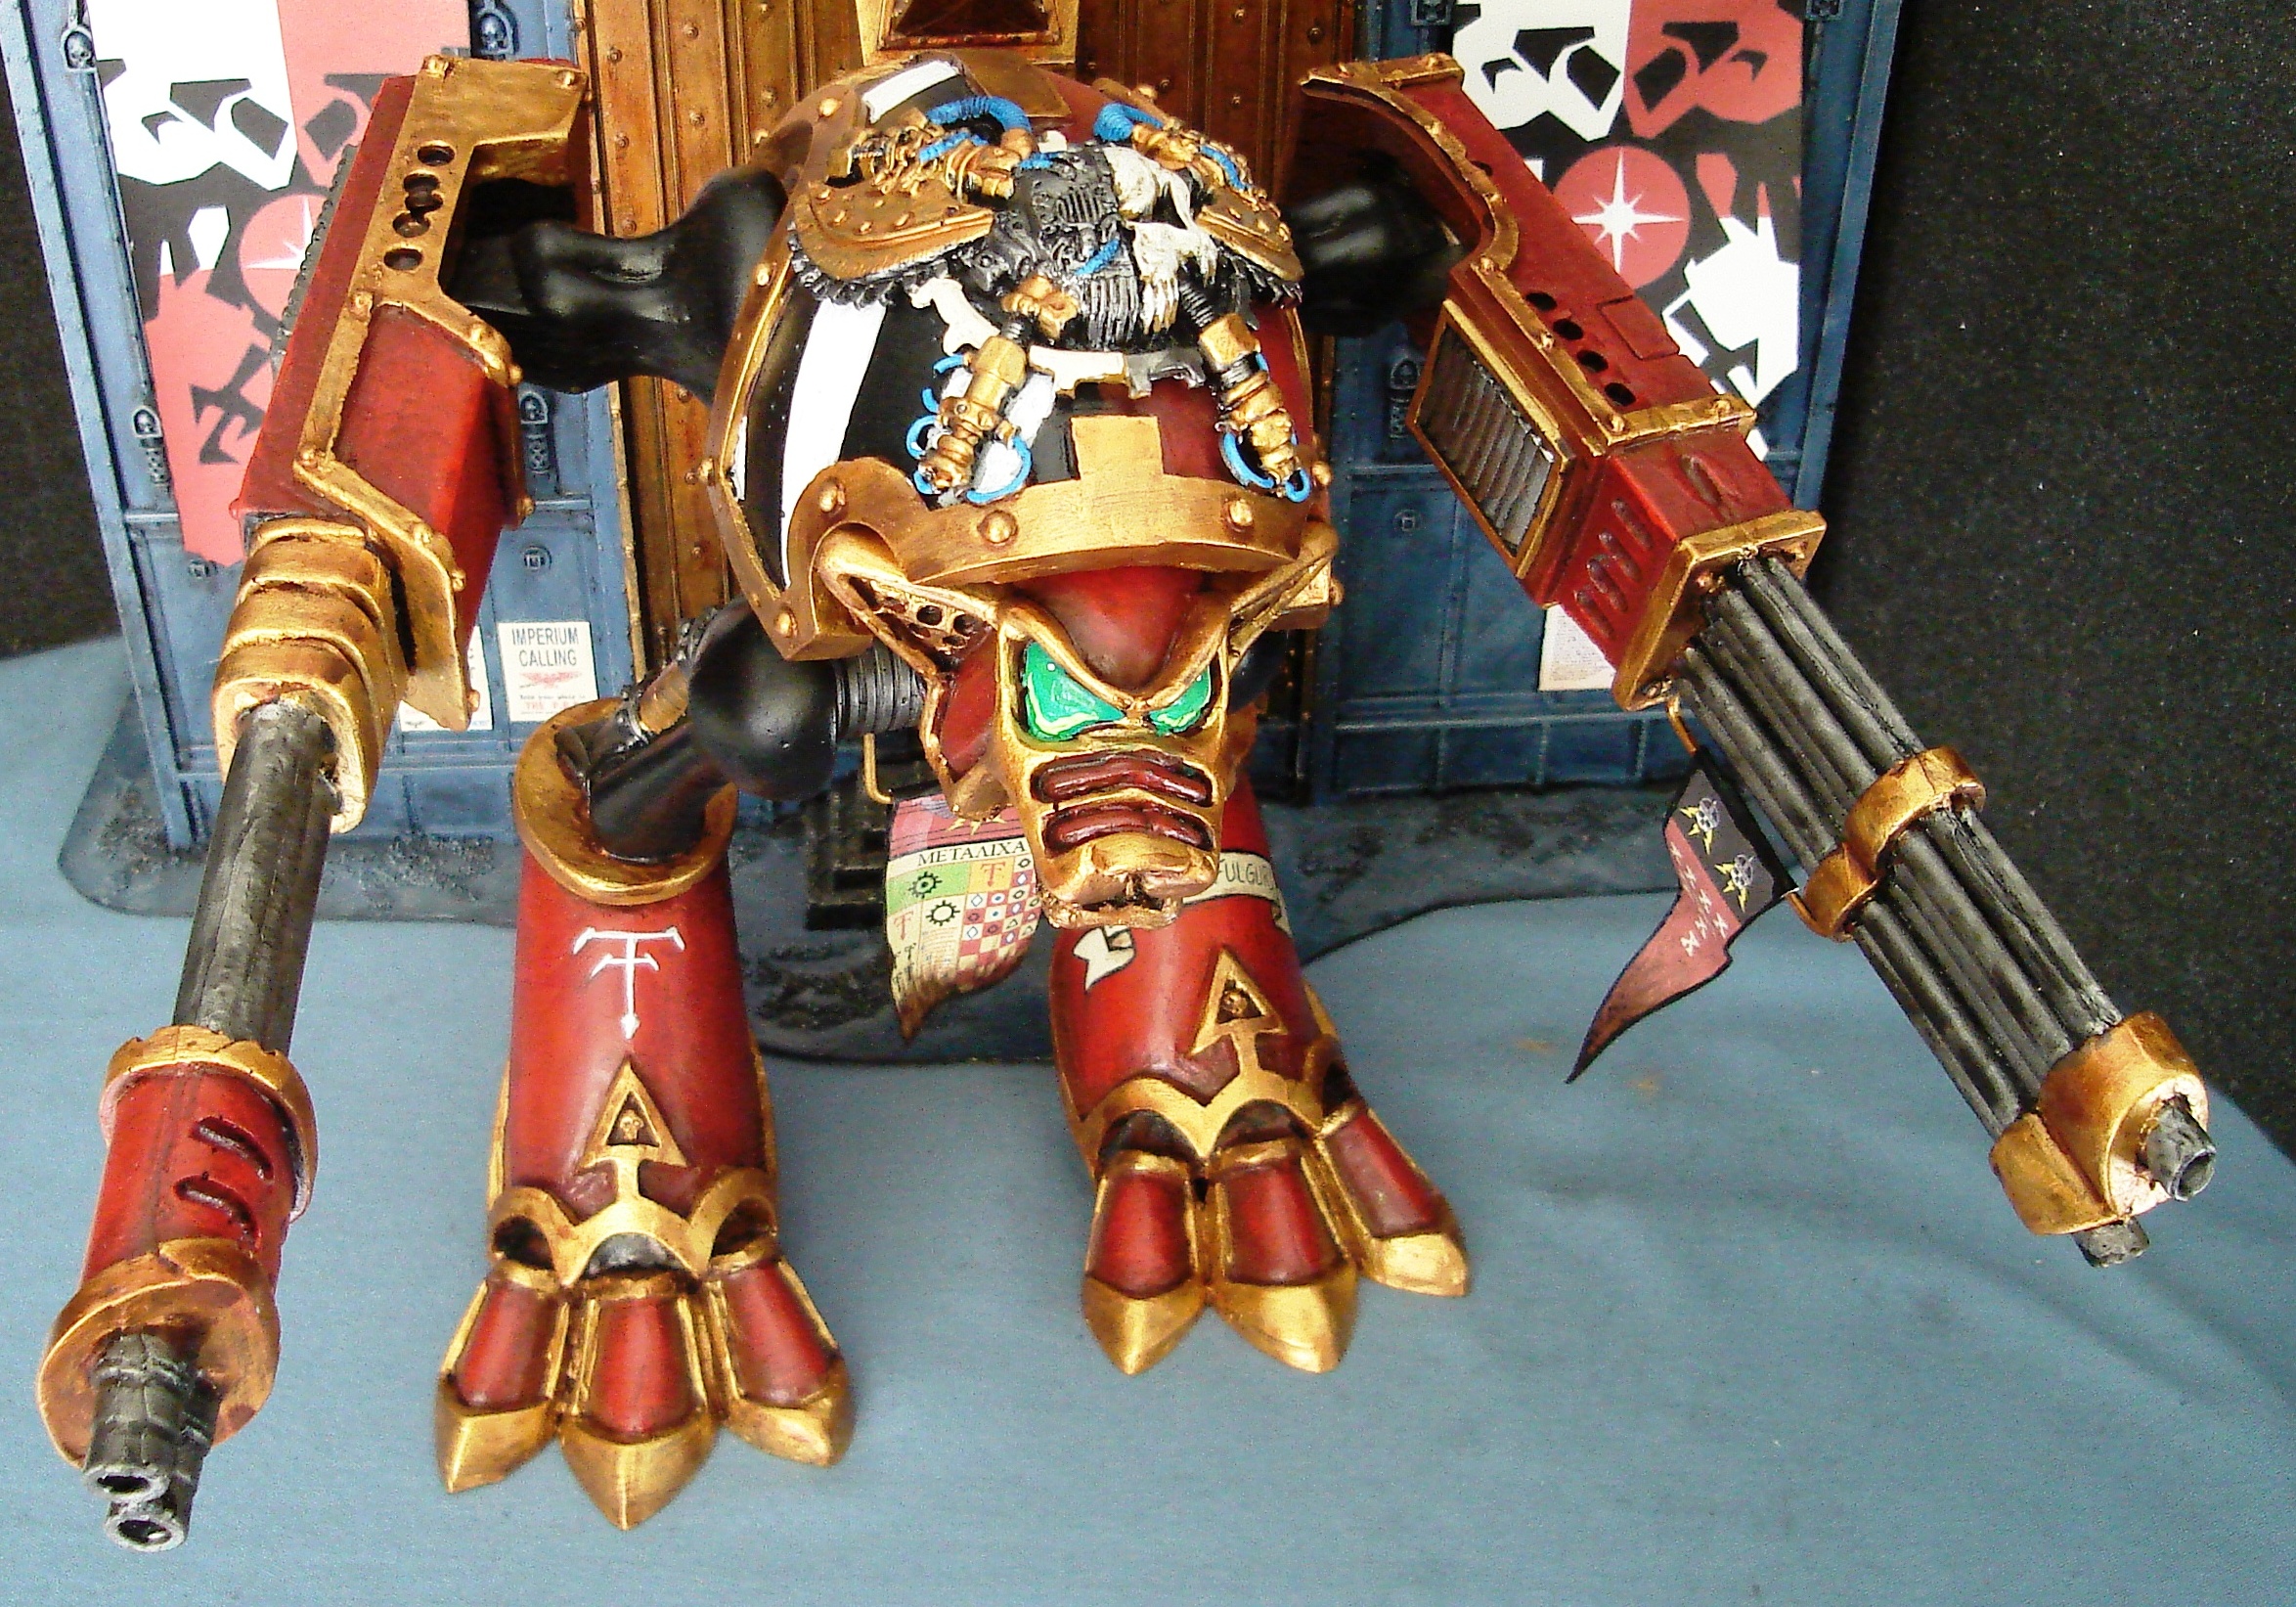
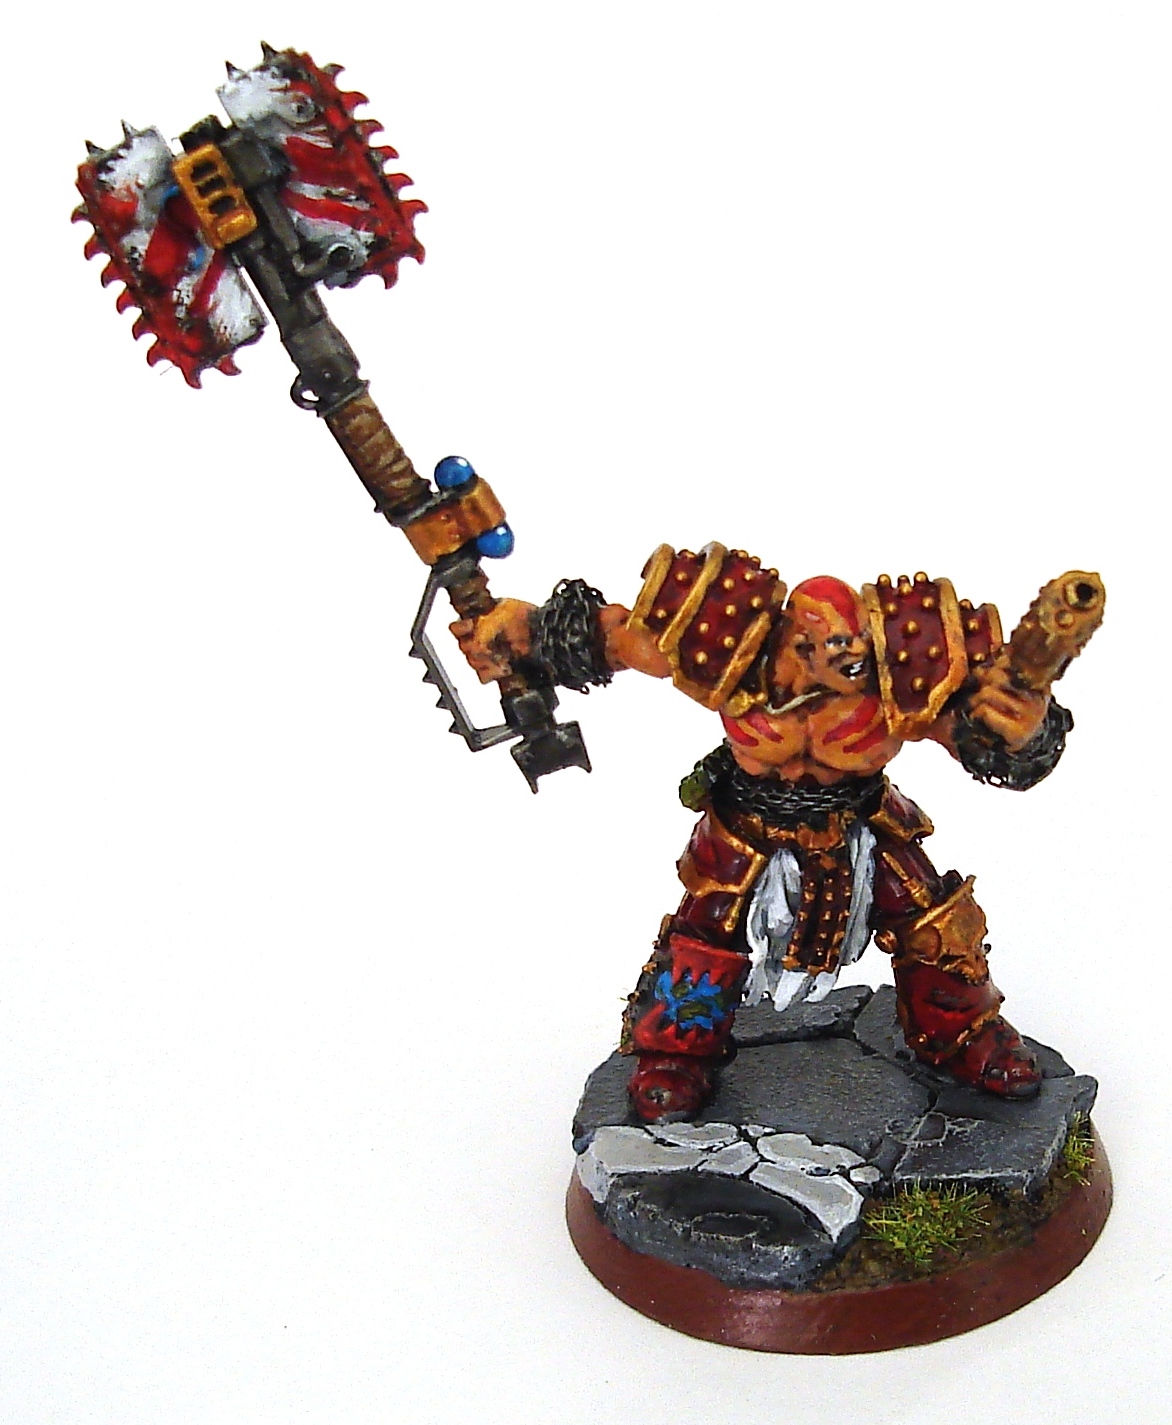
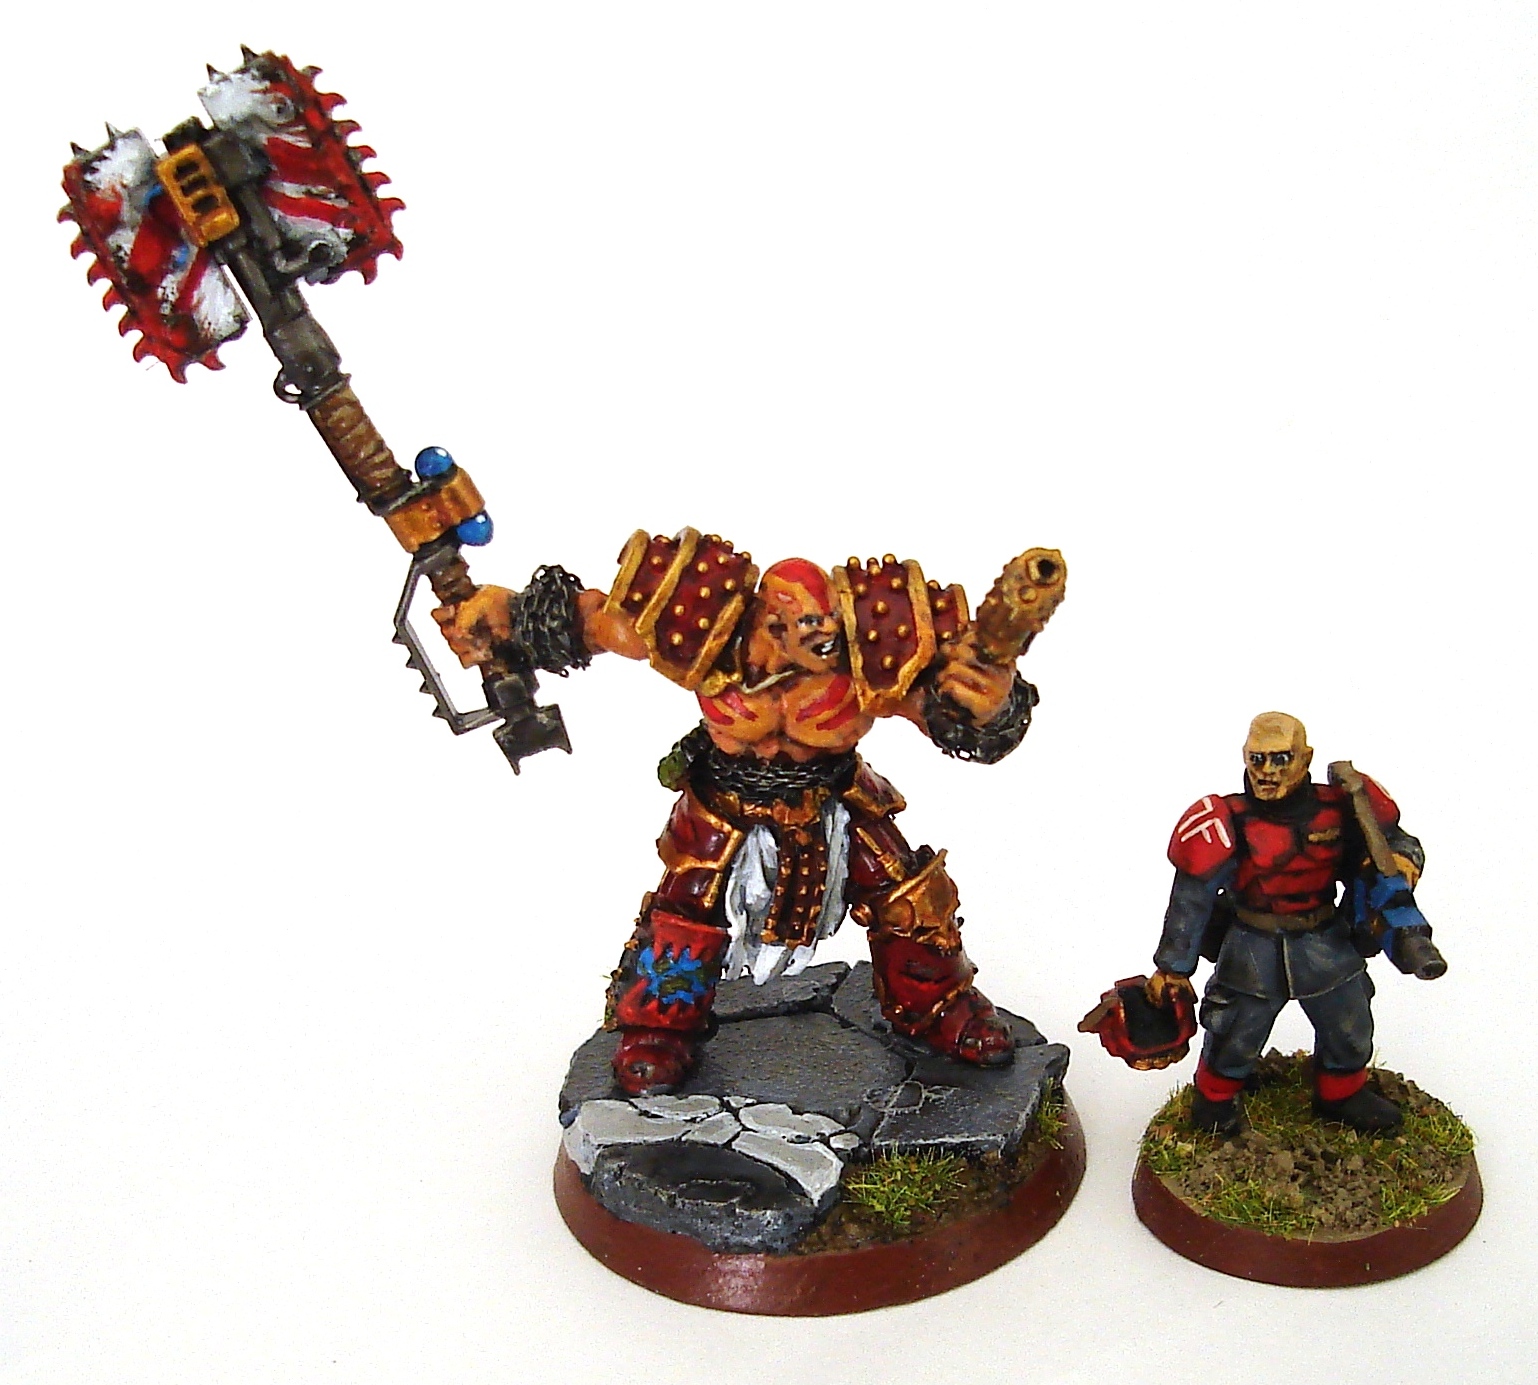
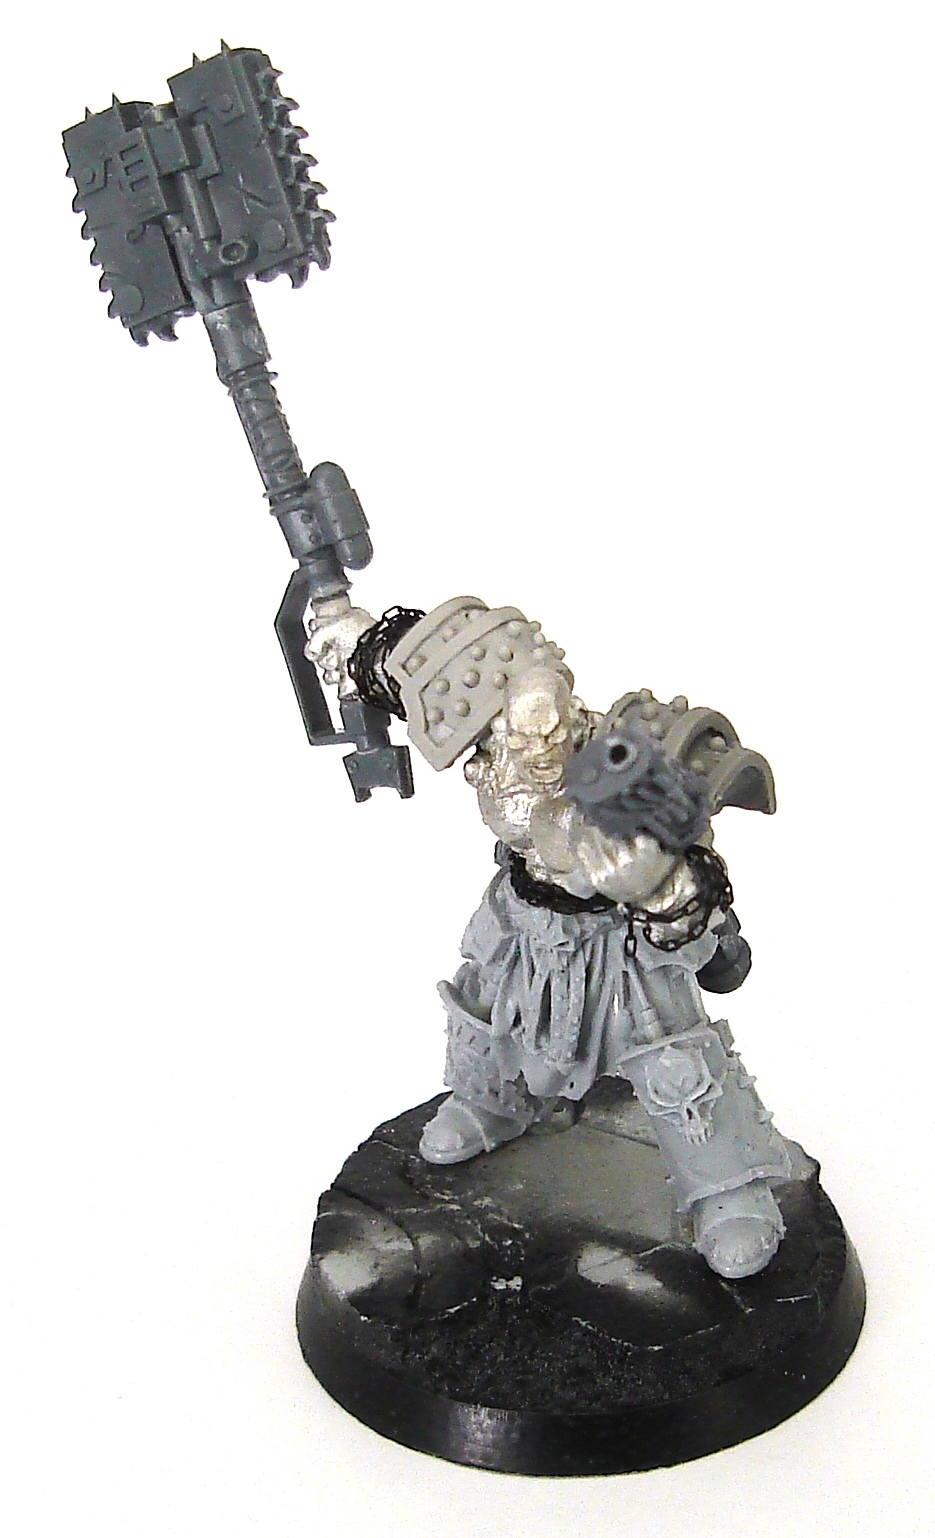
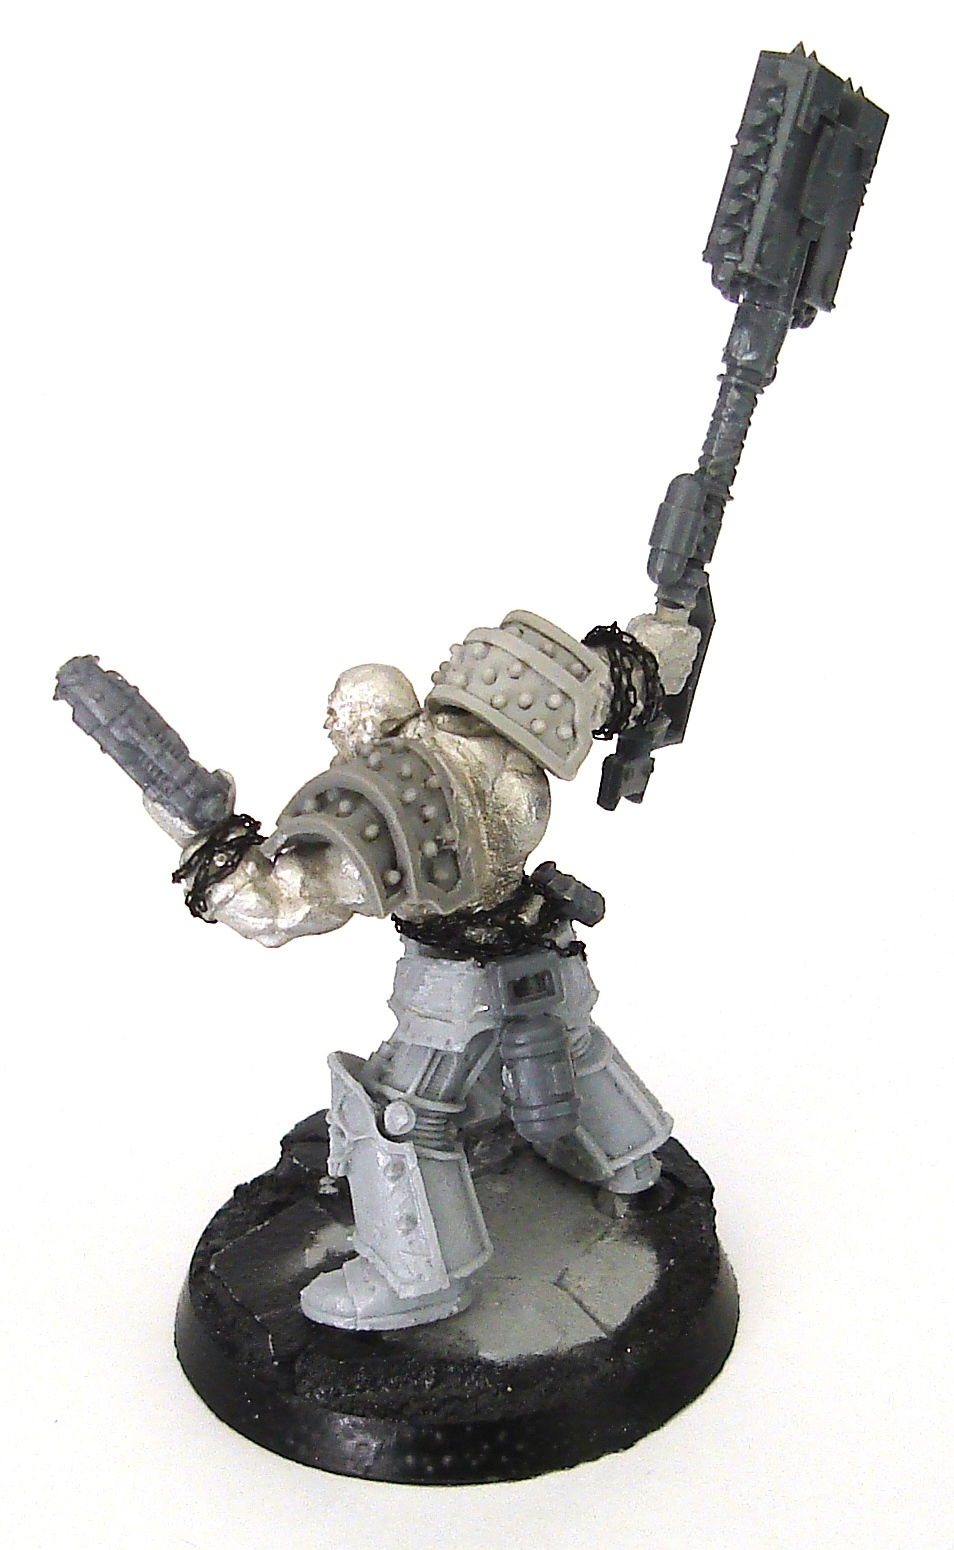
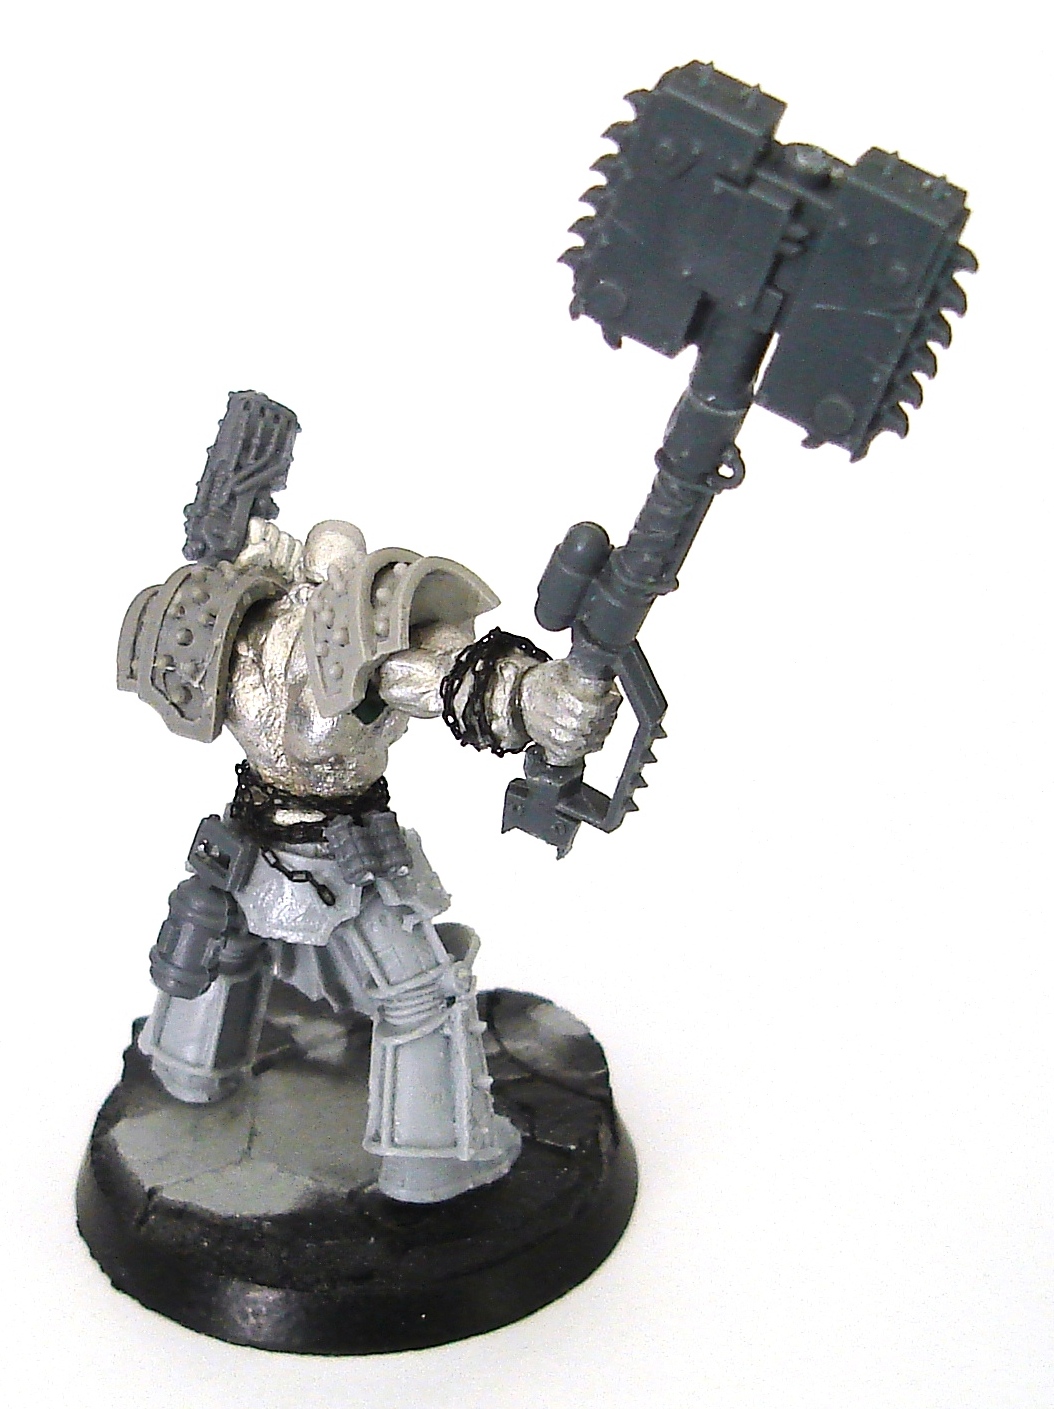
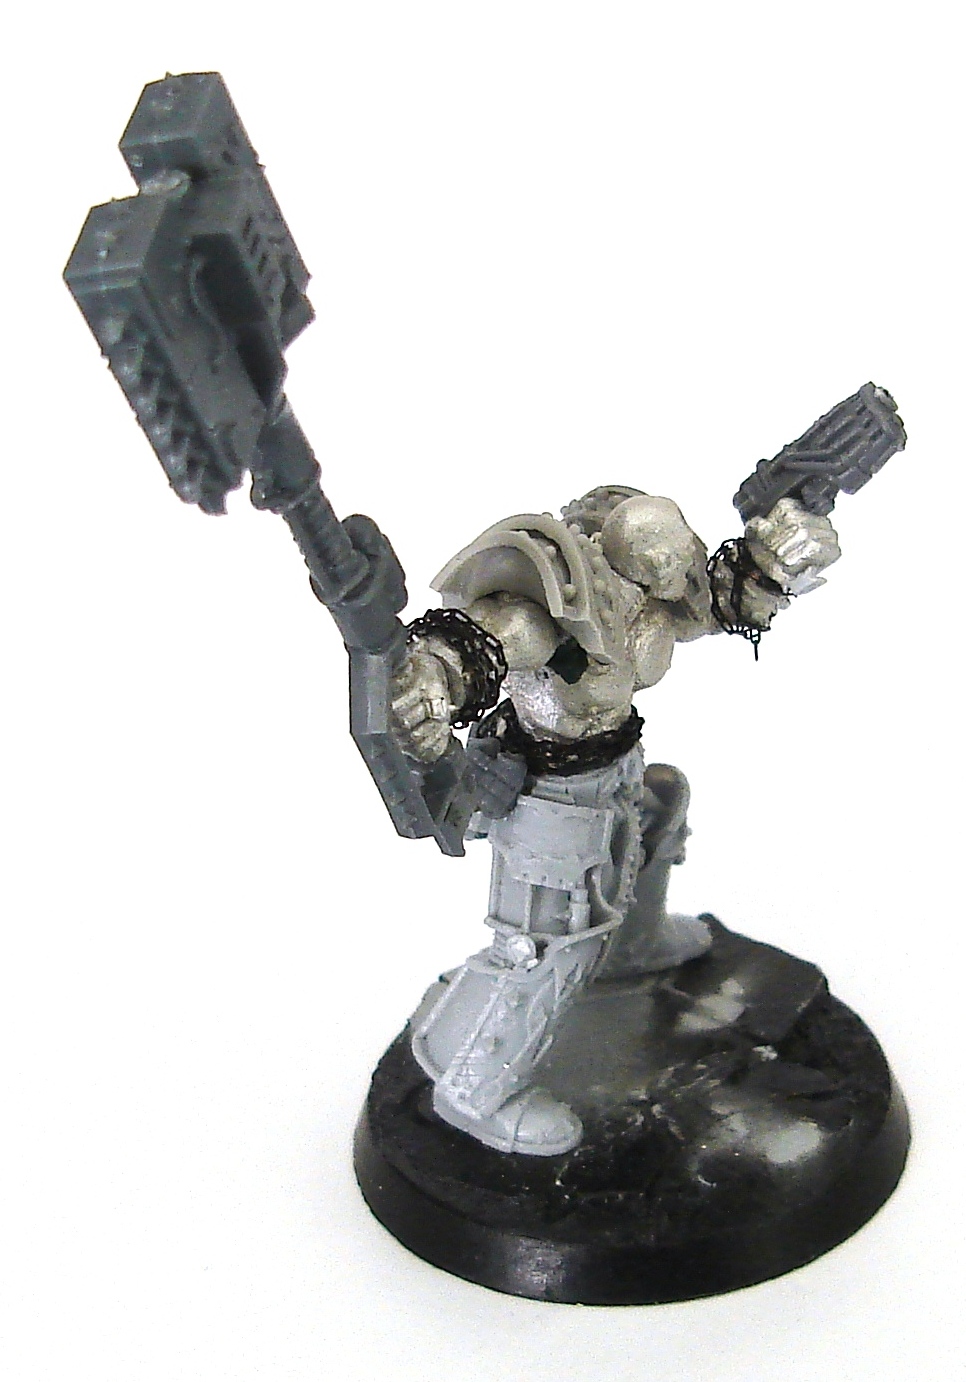
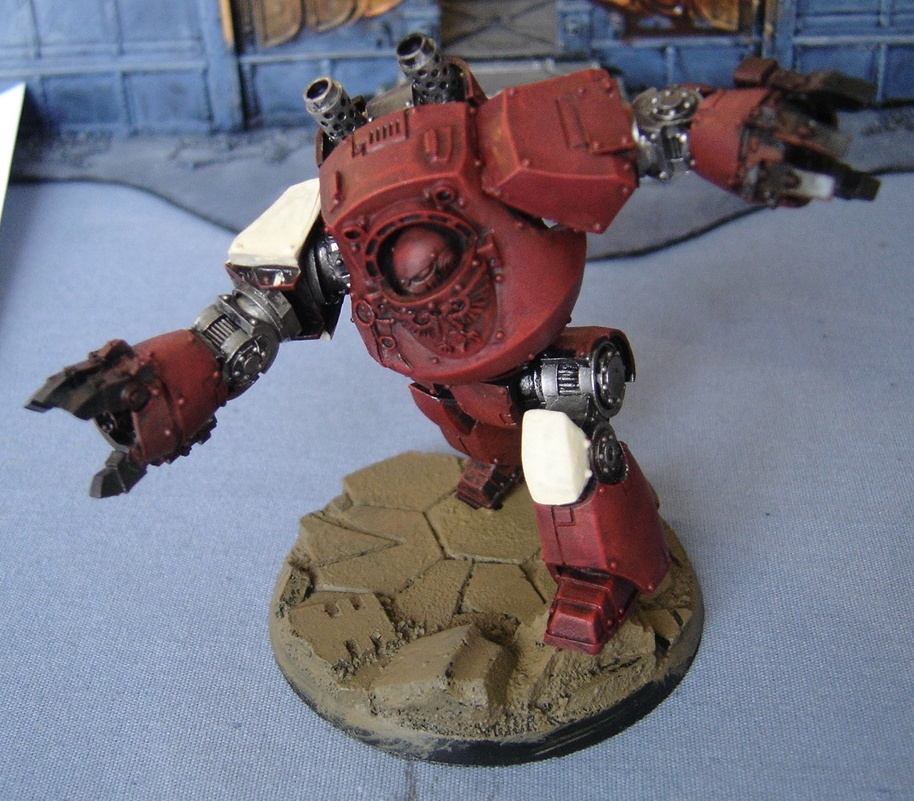
As I'd mentioned in my last post, I have been working on a test model for the World Eaters to try out some various new techniques that I haven't used recently. My Thousand Sons were done up in a "fresh of the showroom floor" style, but I think the World Eaters would benefit from looking a bit more worn and grimy (and blood spattered). In order to give myself some decent areas to work on, I grabbed one of the Contemptor Dreads, stripped the old paint and gave it a shot!


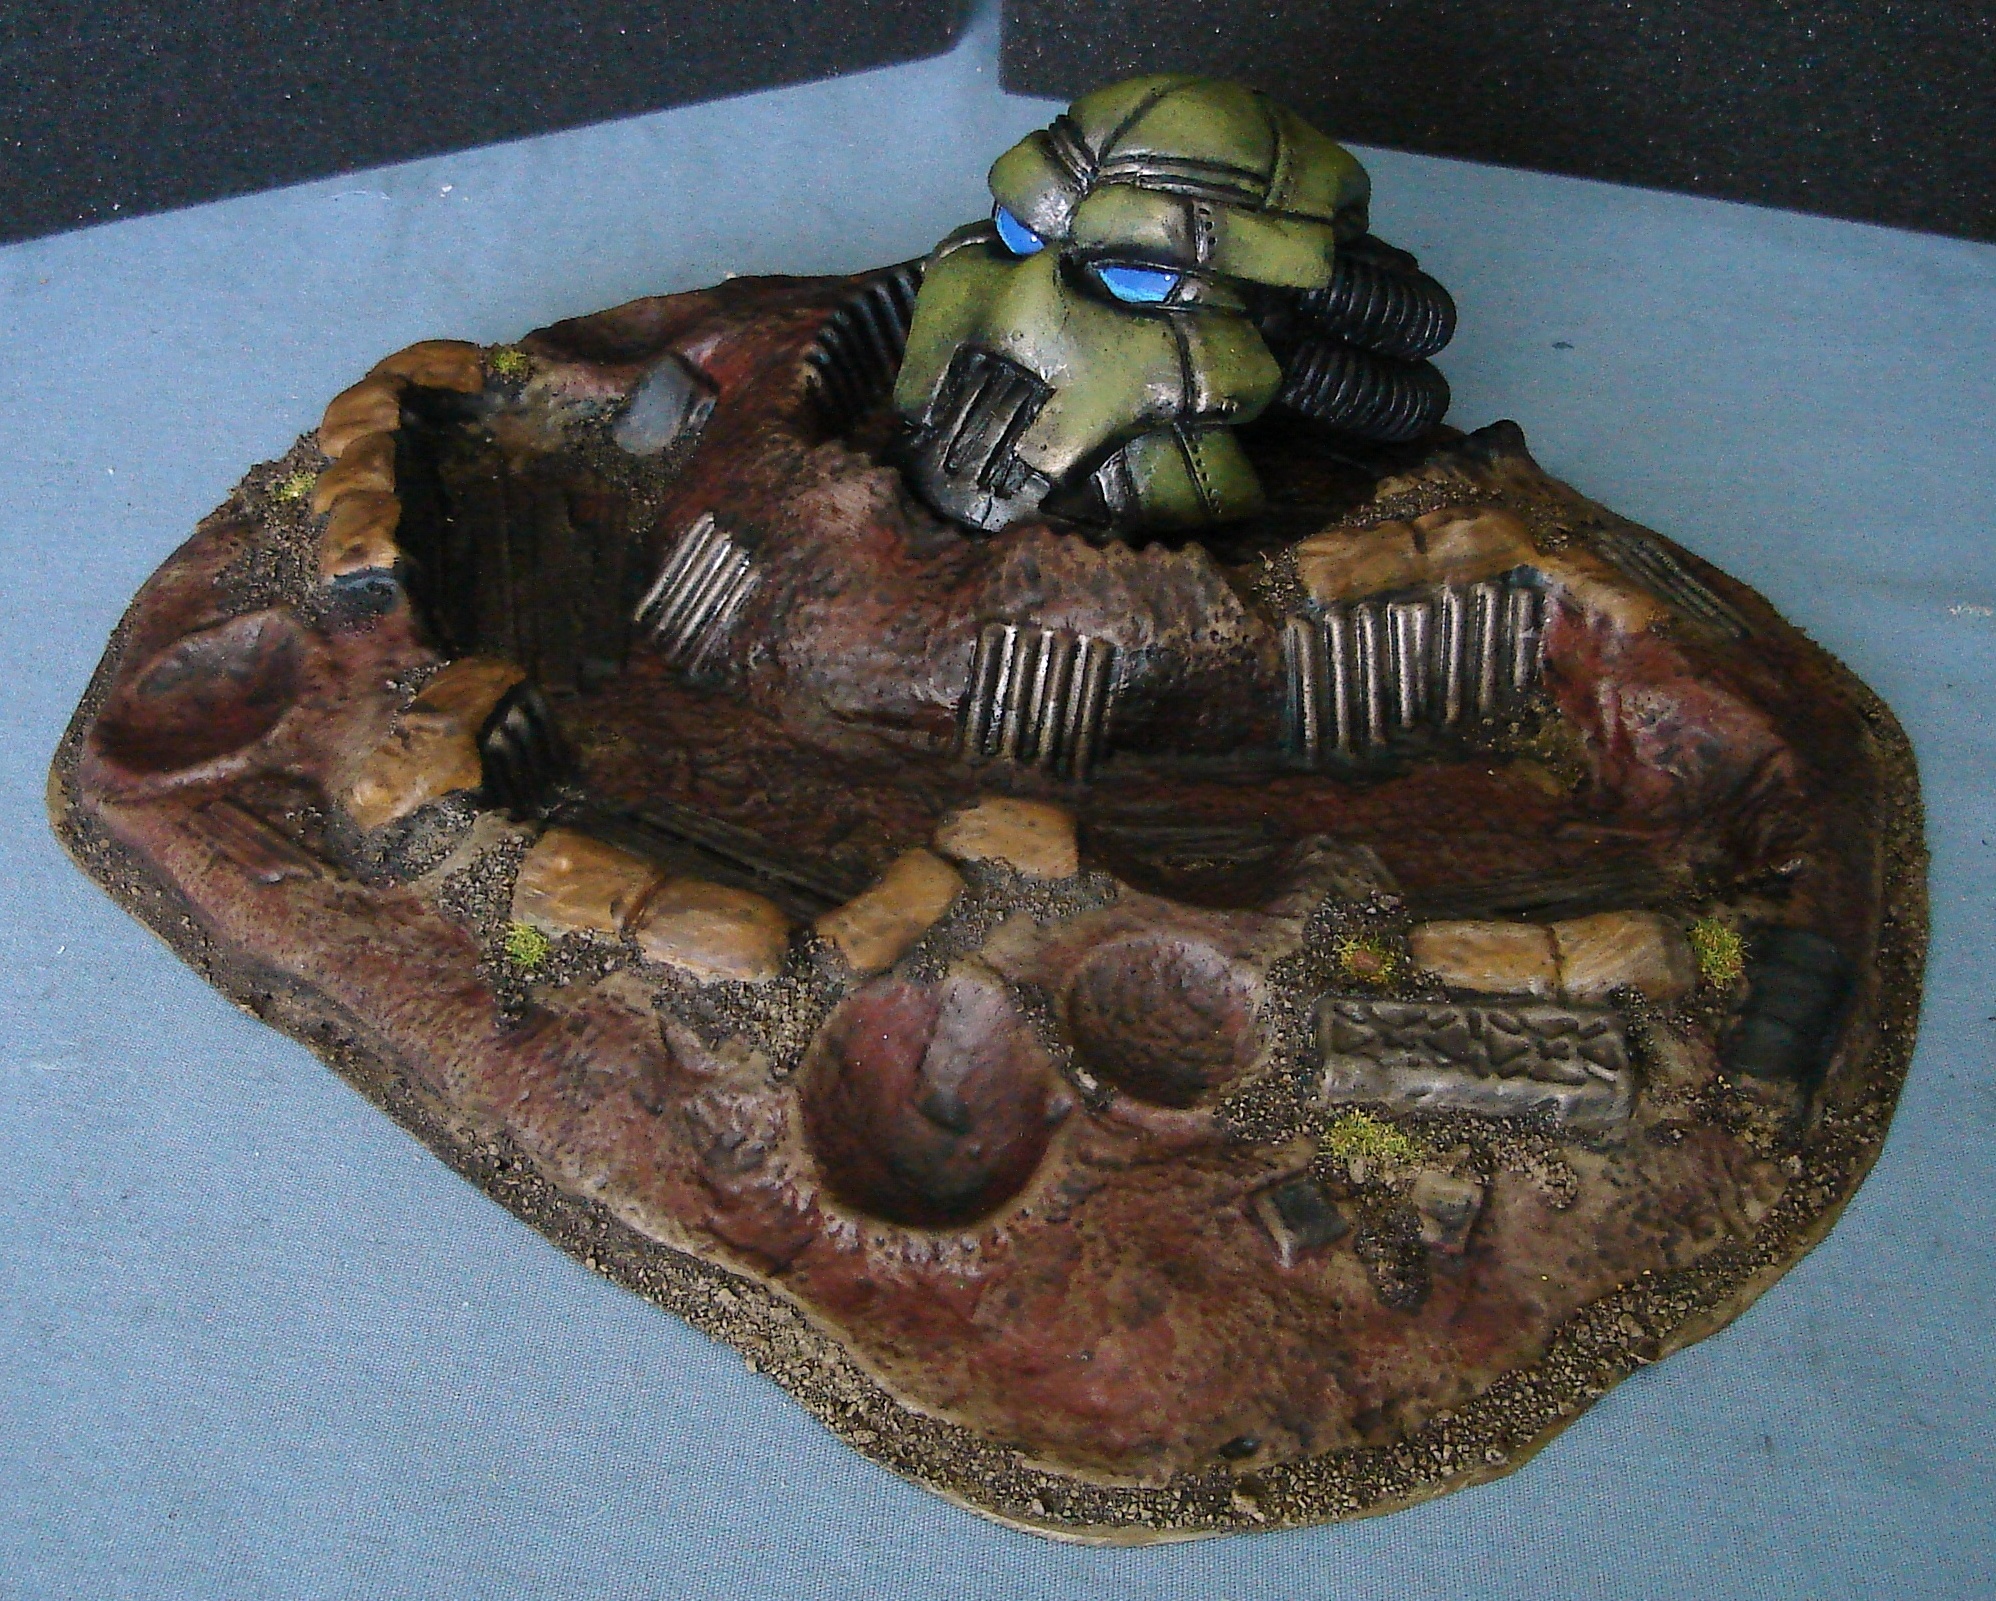
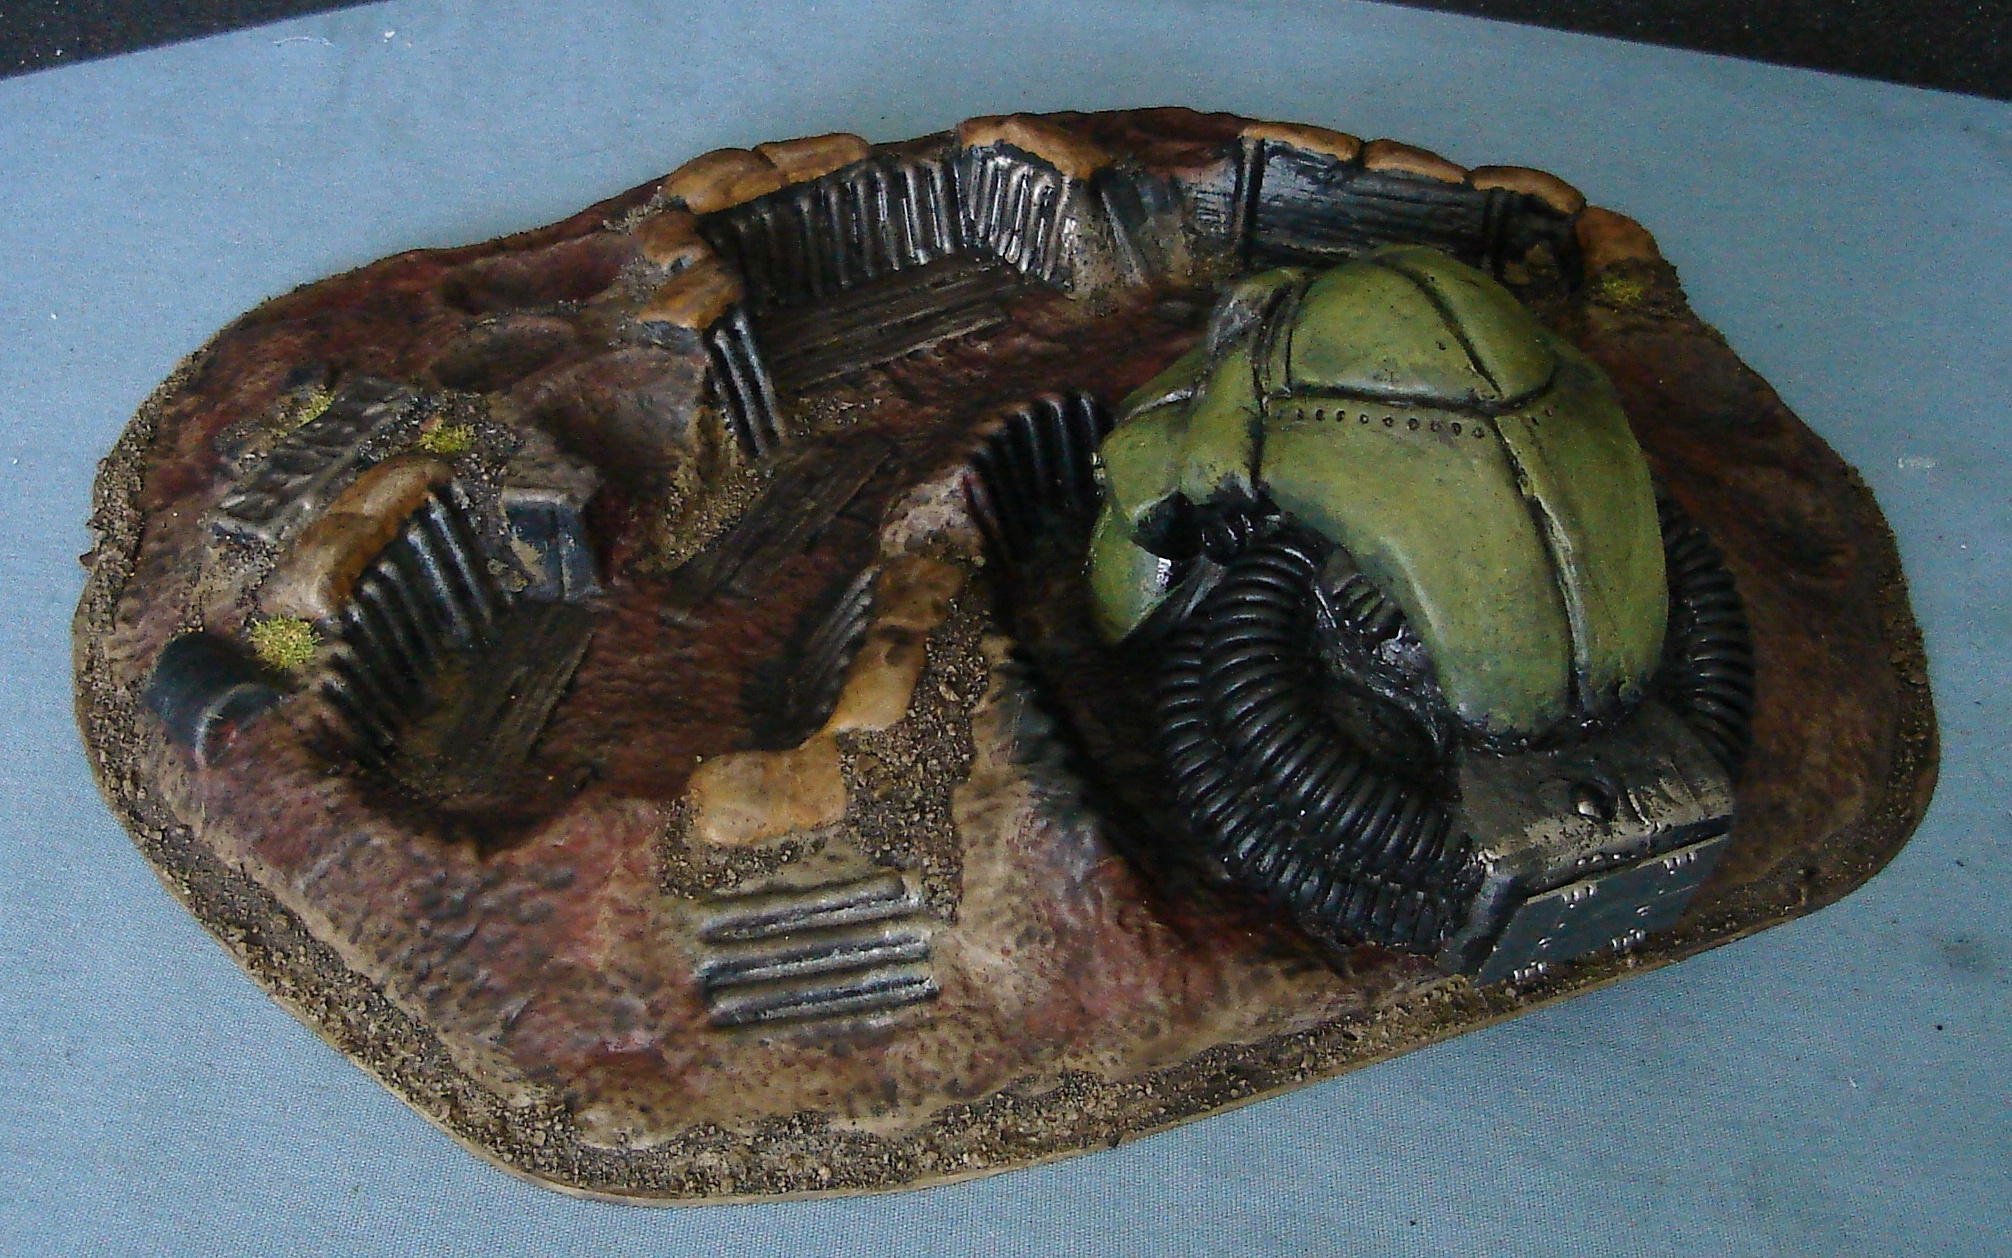
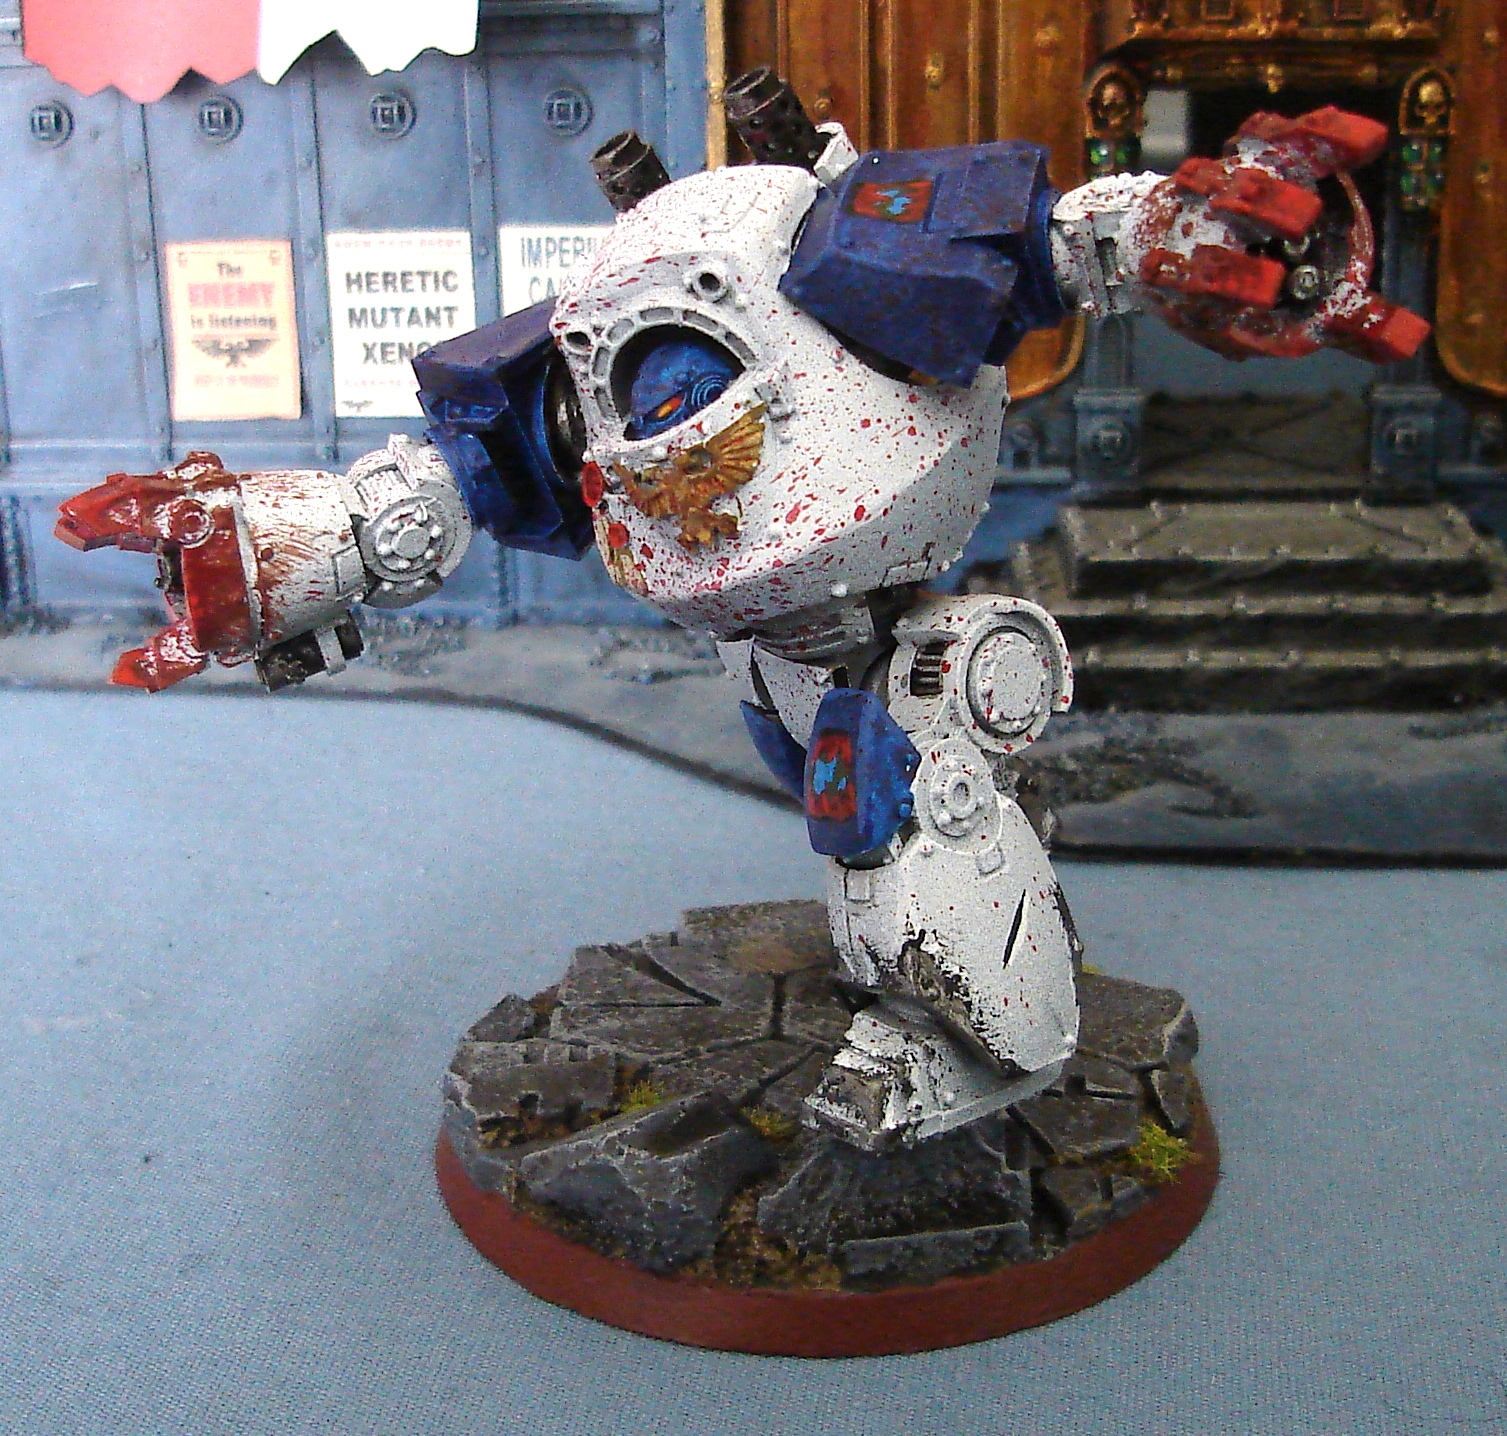
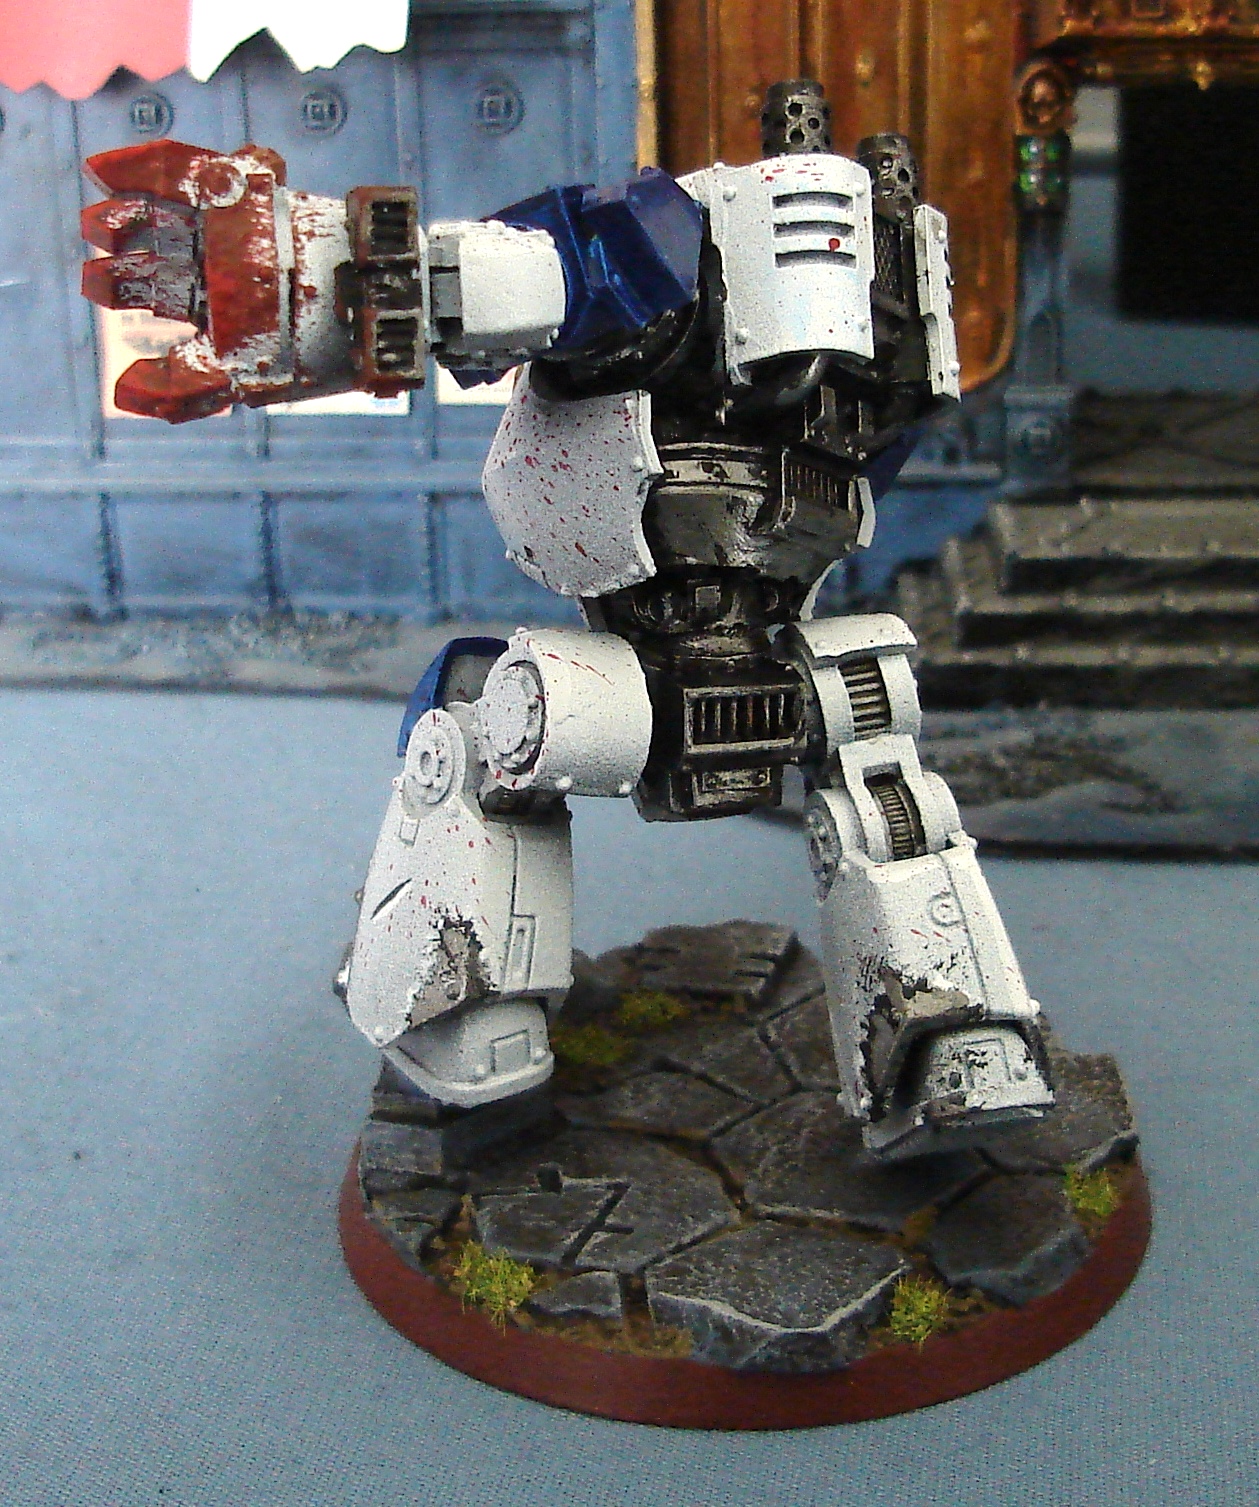
Remember this guy? He was originally intended for the Thousand Sons, but I decided that it didn't really fit my theme. That said, he now looks like this:


Again, leaning heavily on Ron from From The Warp's 
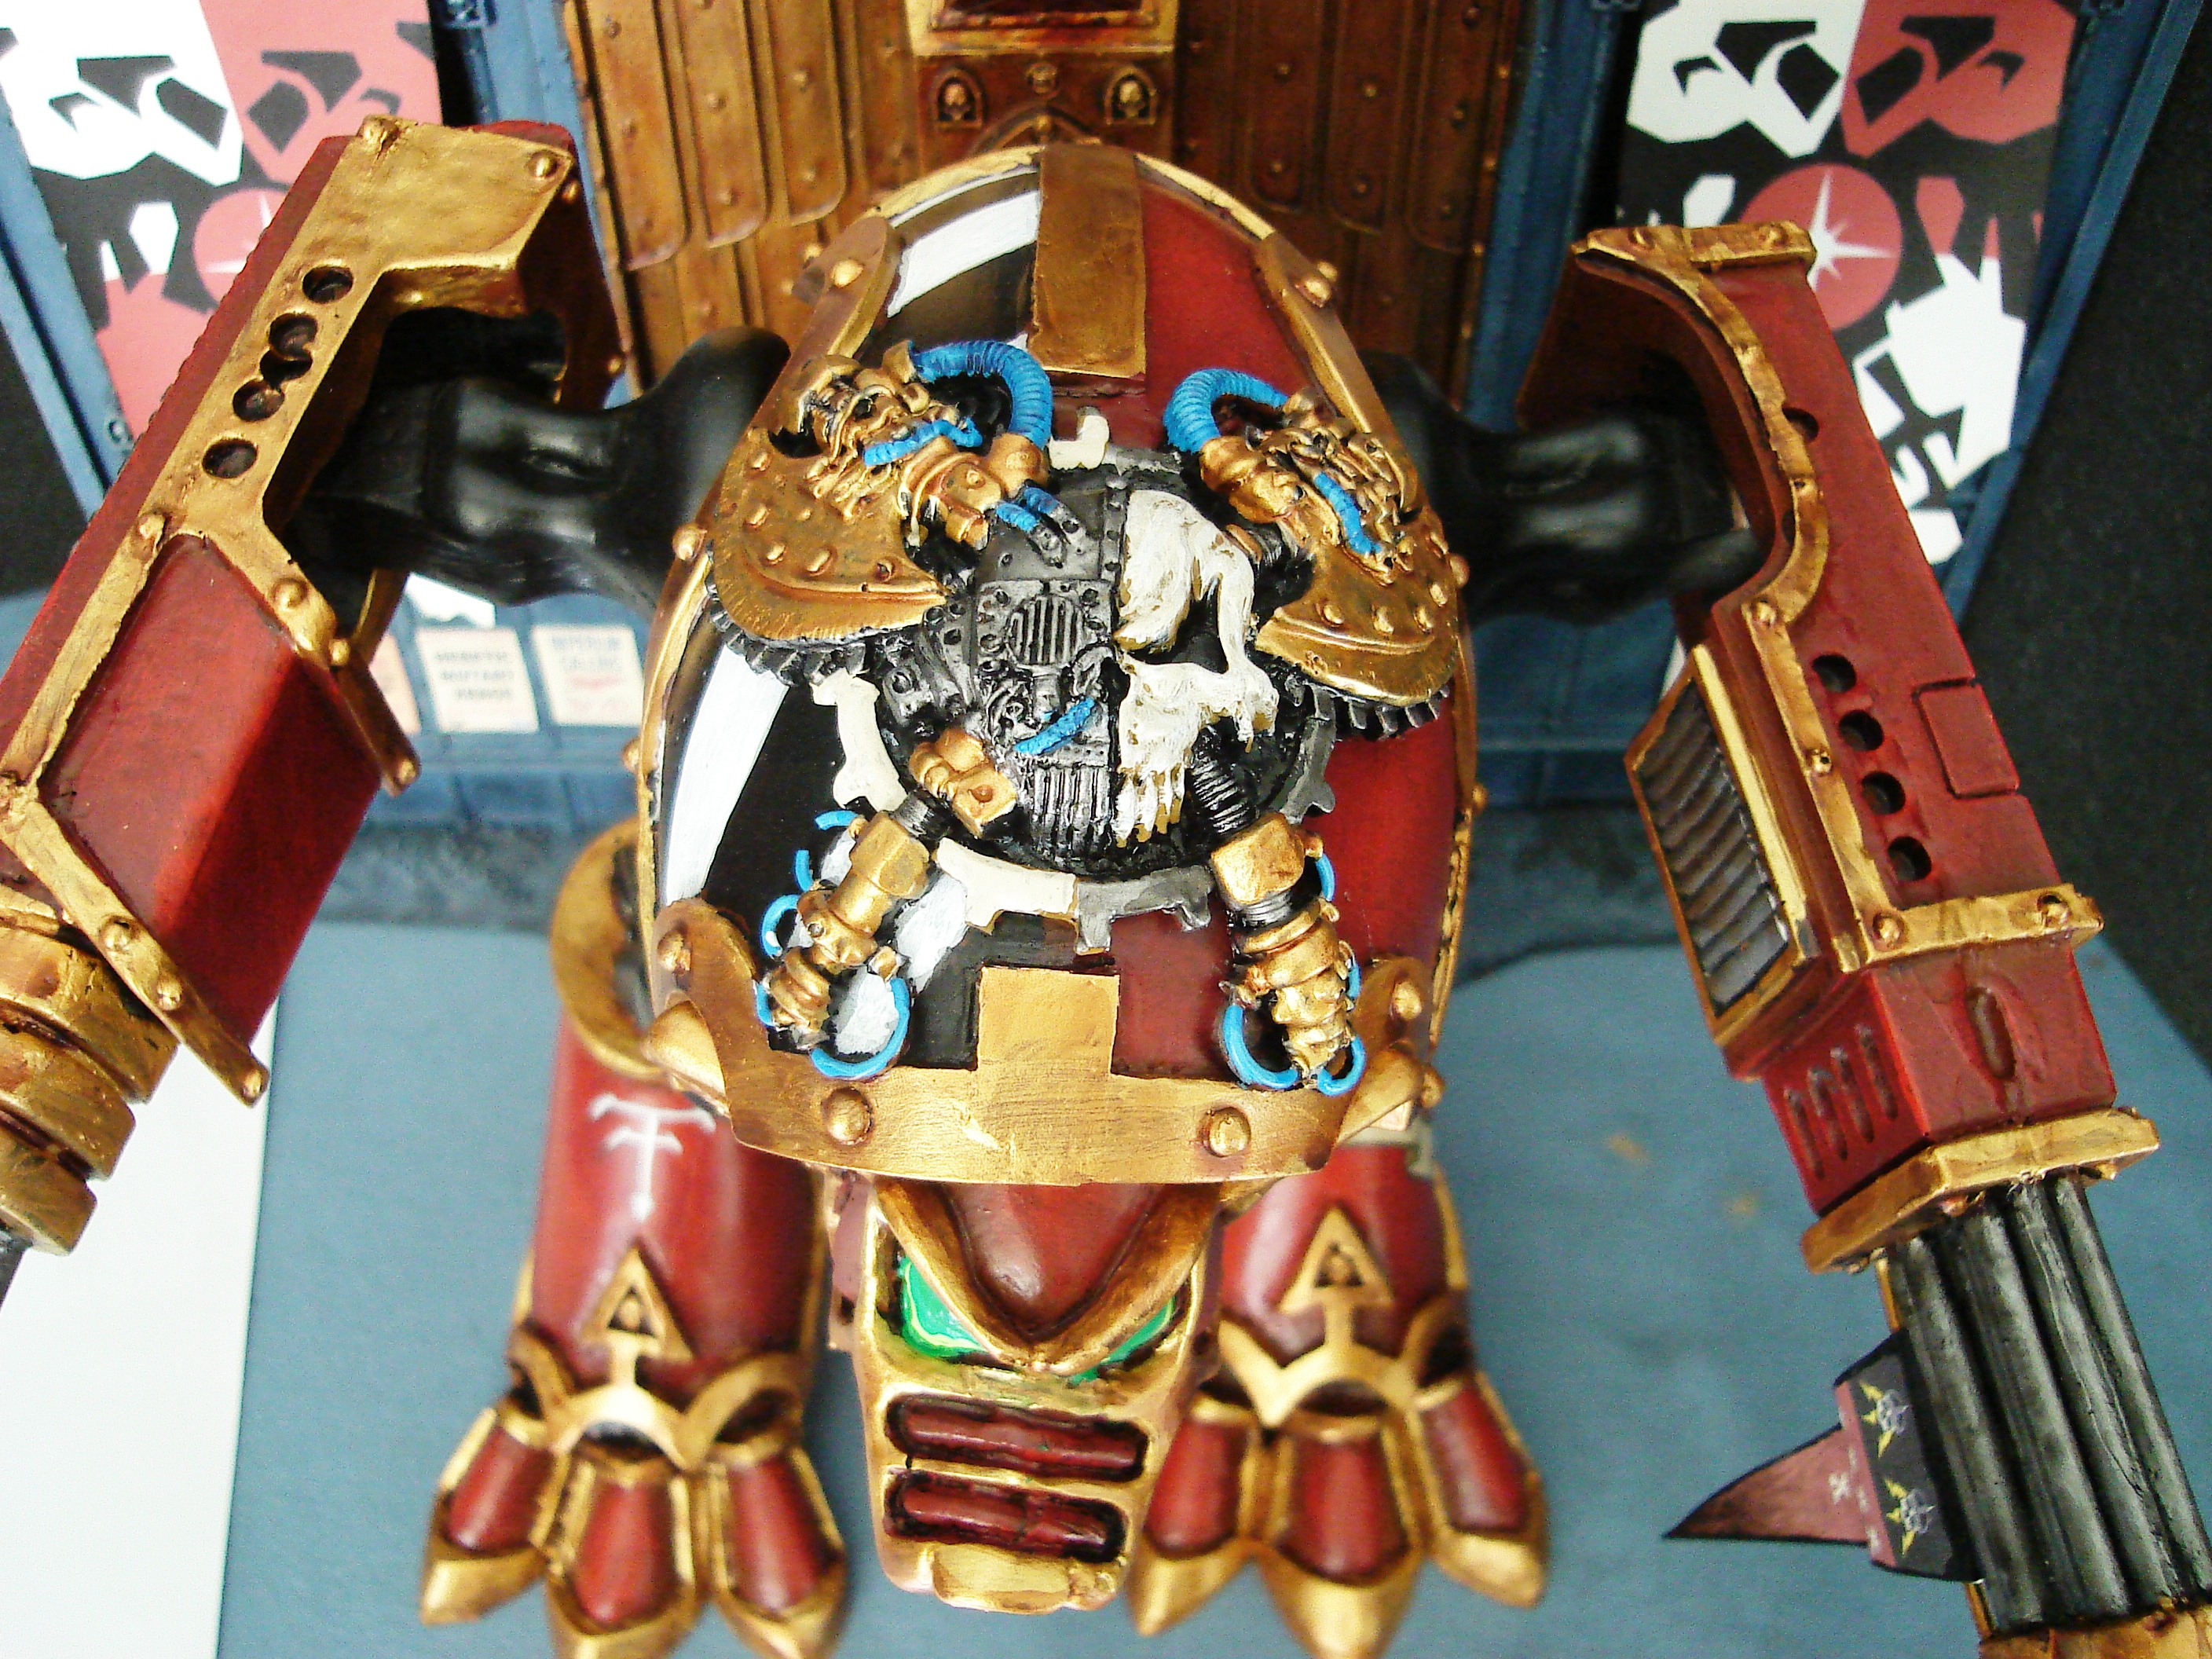
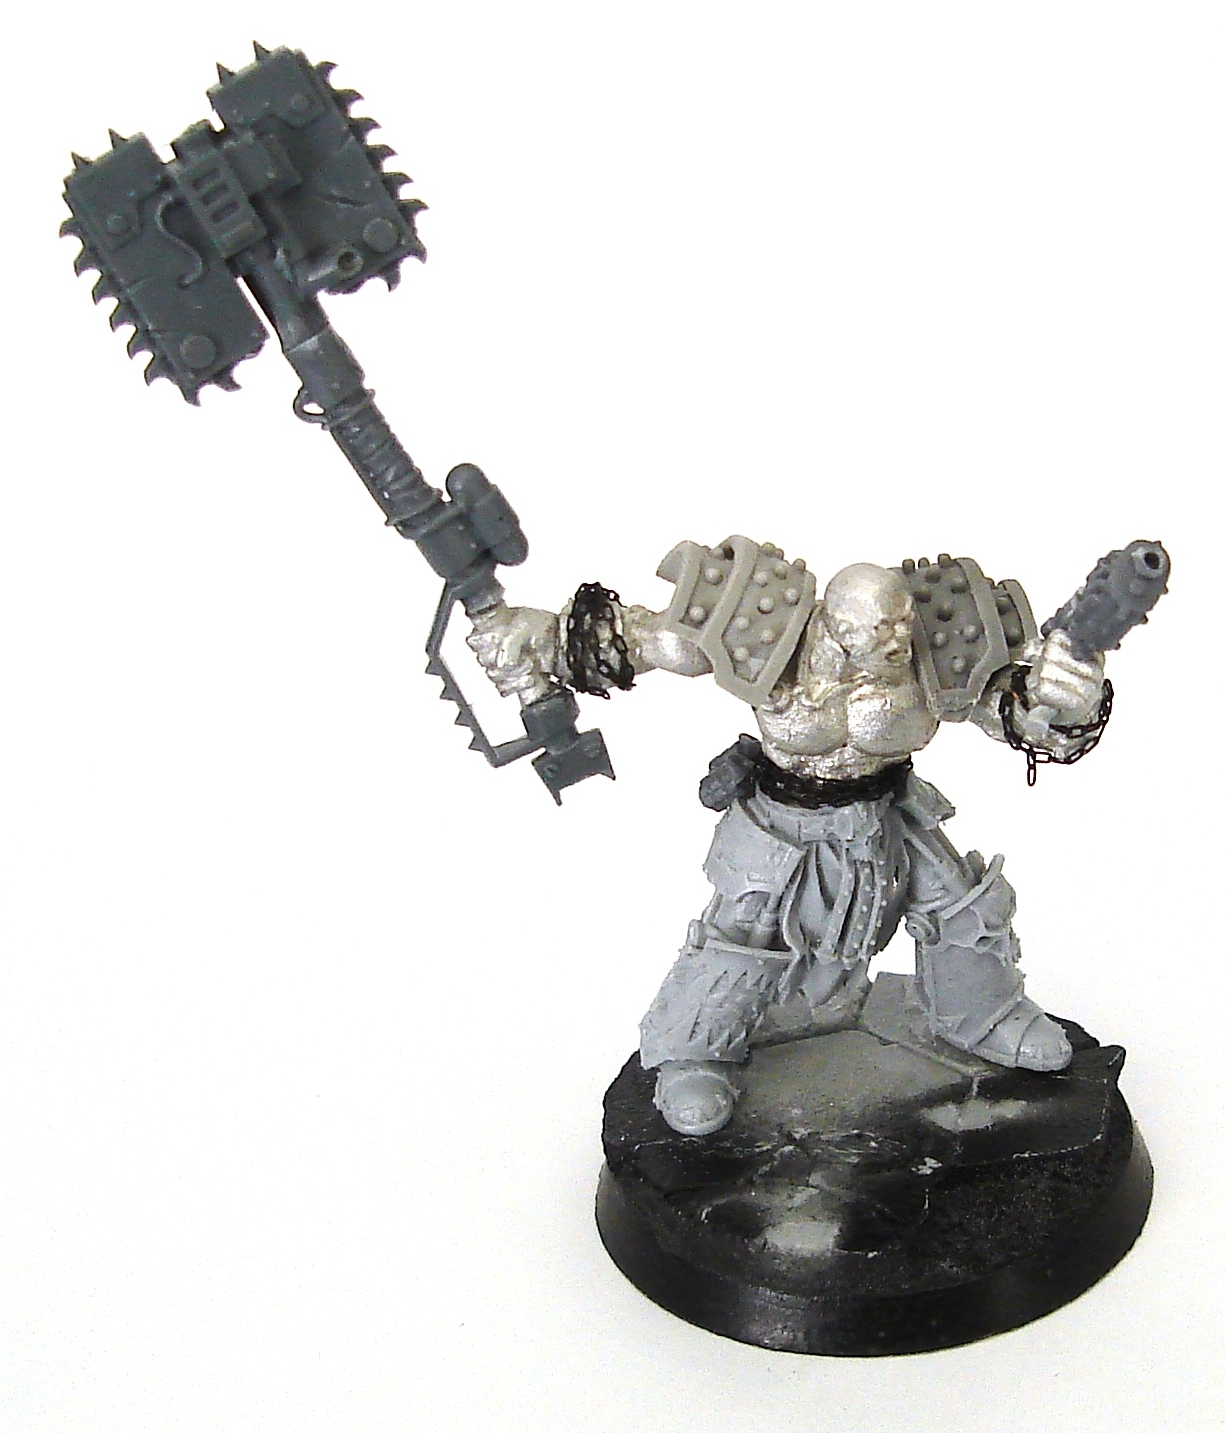
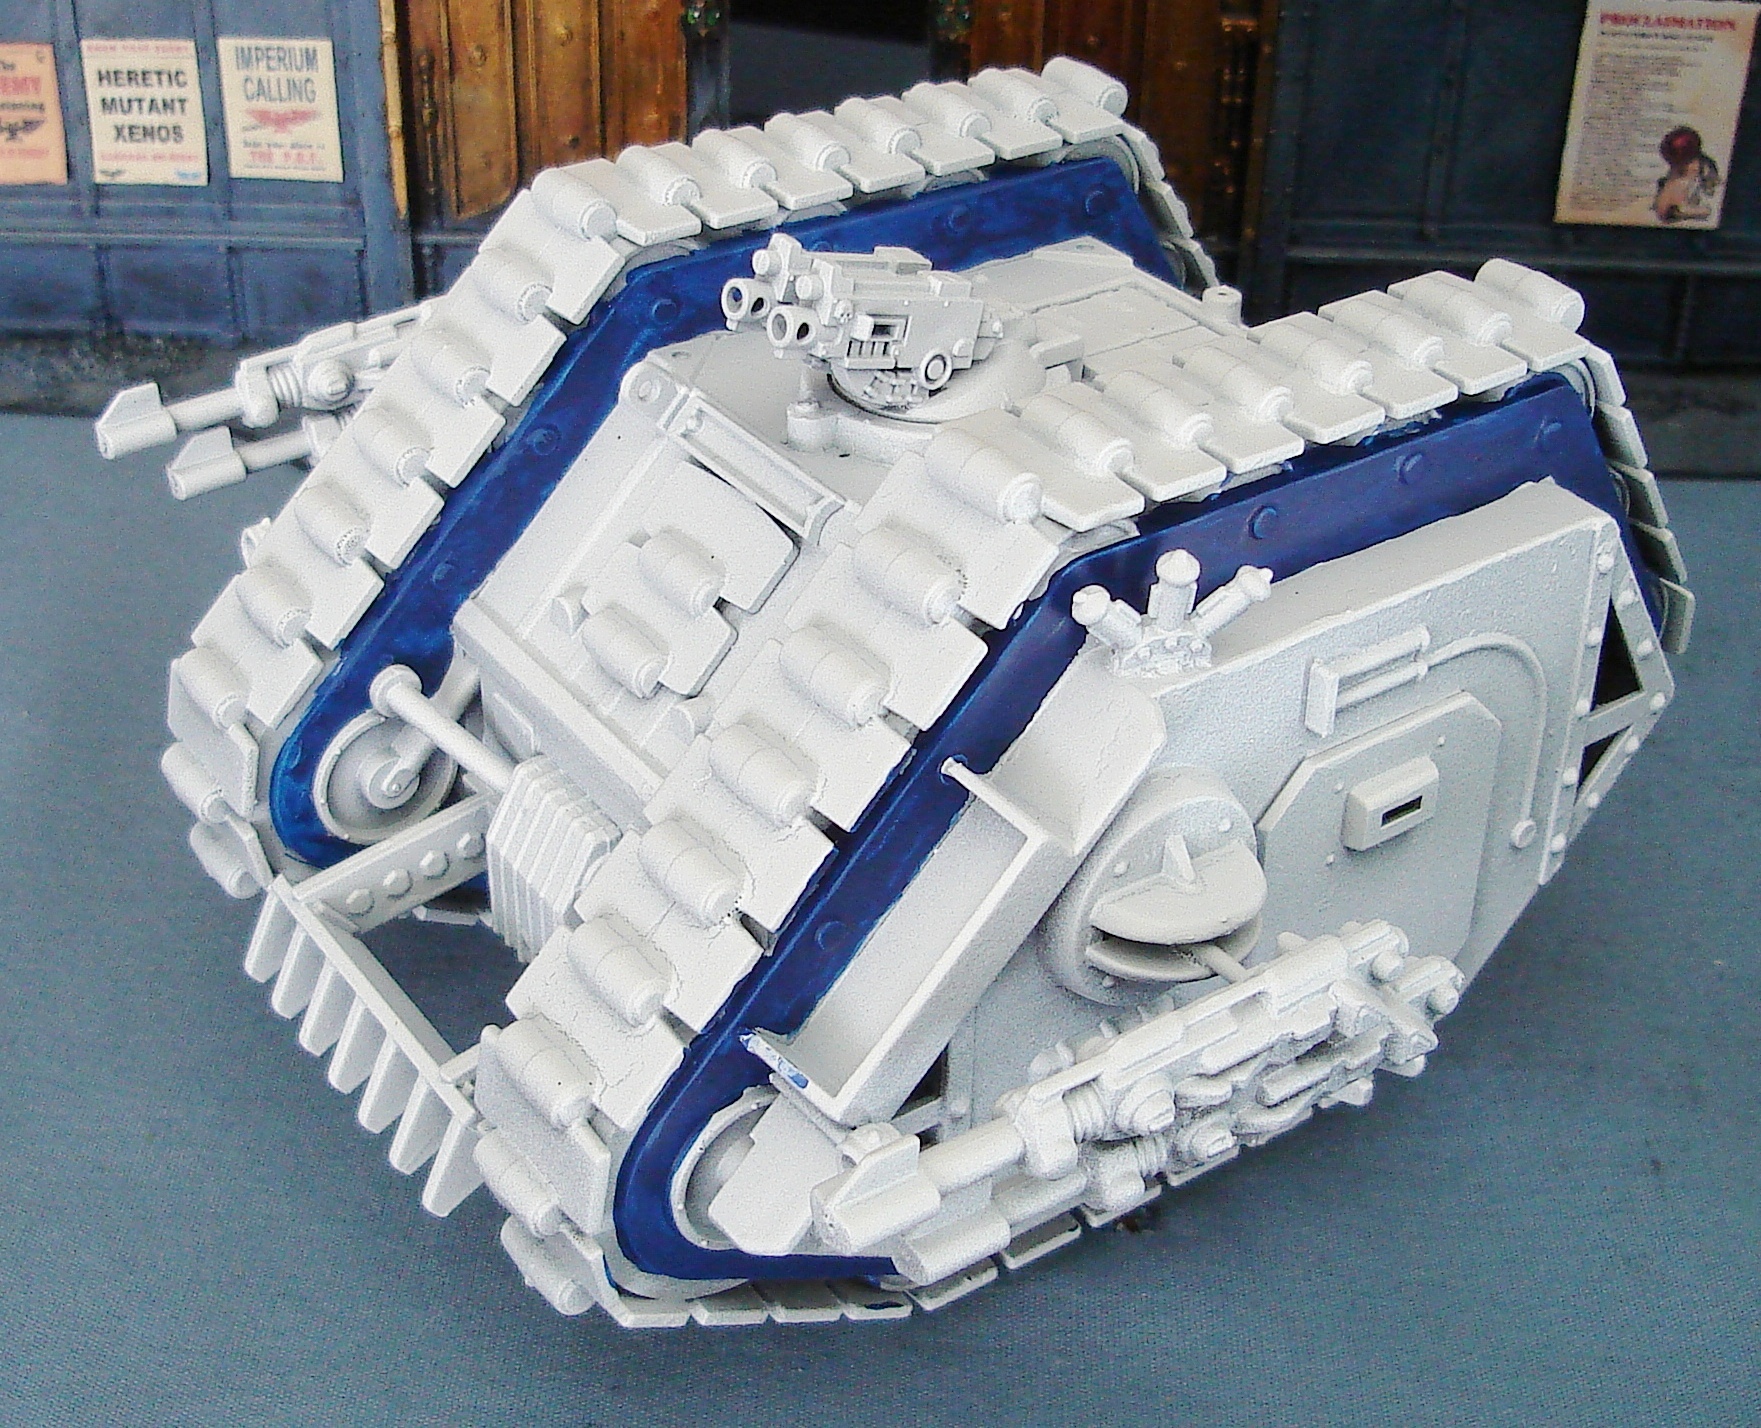
tutorials on painting white, I started with a zenithal primering method. I started off with a medium grey primer and gave the whole thing a good coat, then grabbed a light grey primer and gave it another coat, though this time I only hit it from a little above horizontal up to vertical. After that dried I hit it one more time with a pure white primer though only from (more or less) directly overhead. This gave the whole model a fairly decent grey-to-white shading for all the armor plates. I touched up some of the edges with skull white, but other than that, relied on the white primer entirely for the armor itself. Easy peasy!


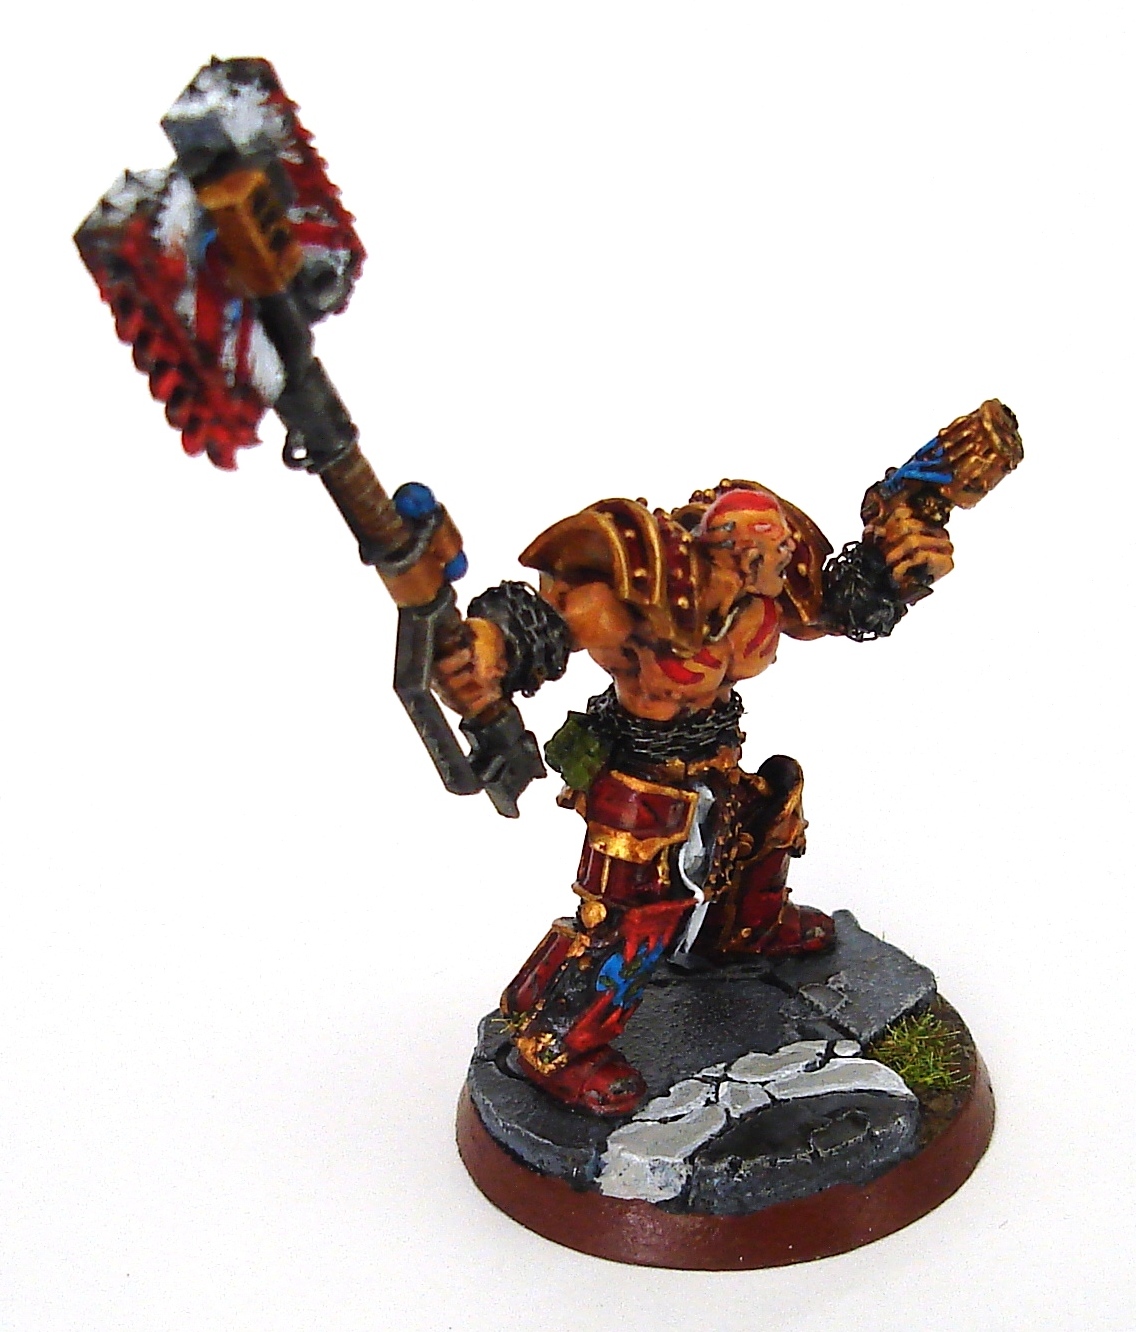
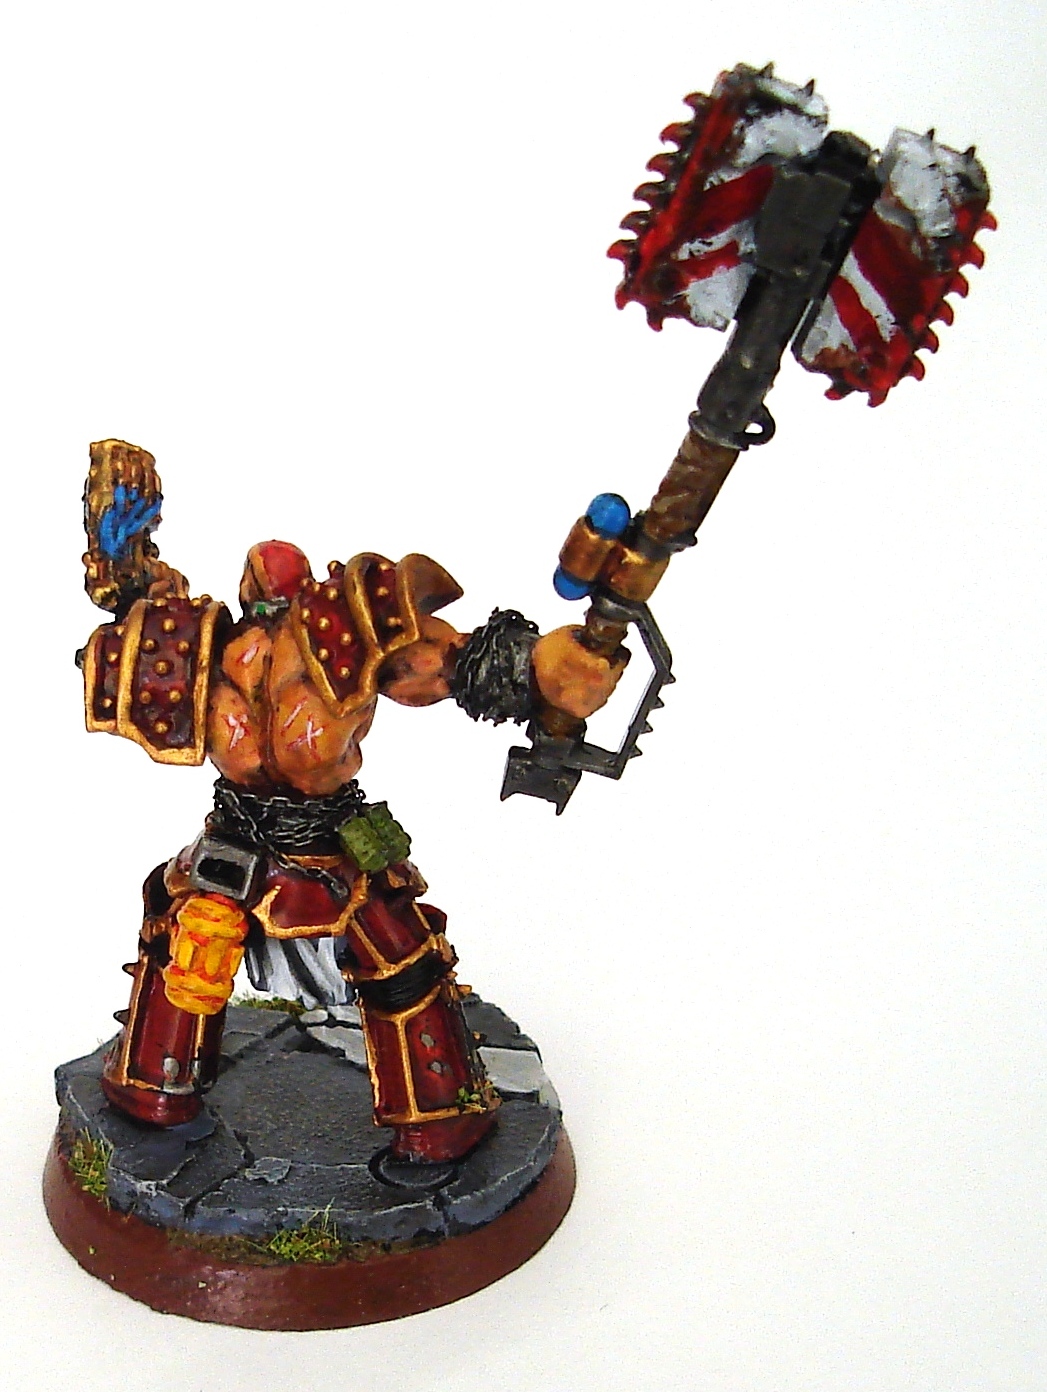
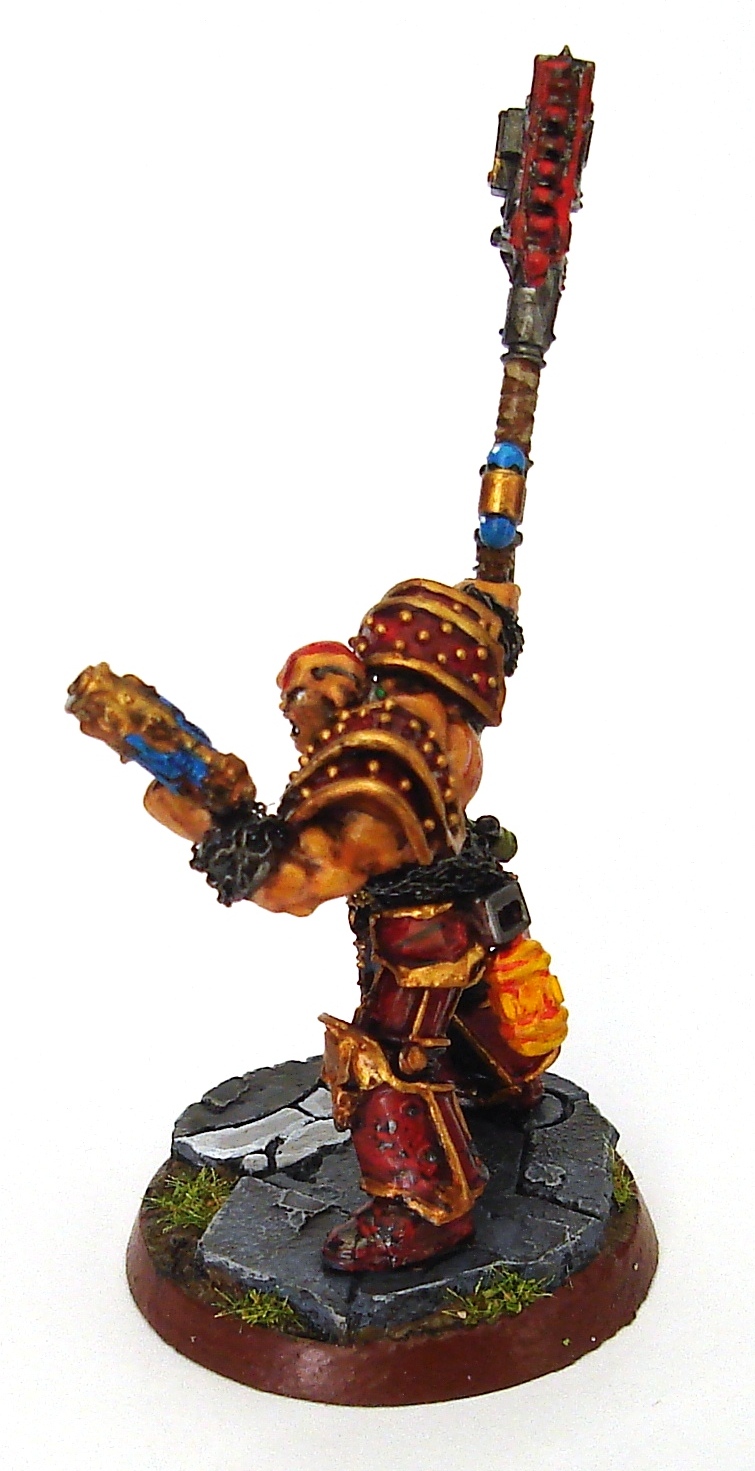
After that step, I went in and painted all of the bits that were going to be metal in chaos black, followed by a boltgun metal layer and a black wash. The blue areas were coated in Regal Blue with an Ultramarines Blue highlight, and the various purity seals and whatnot were picked out in their appropriate colors. Then I took a run at painting on the World Eaters symbol as detailed in my previous post.


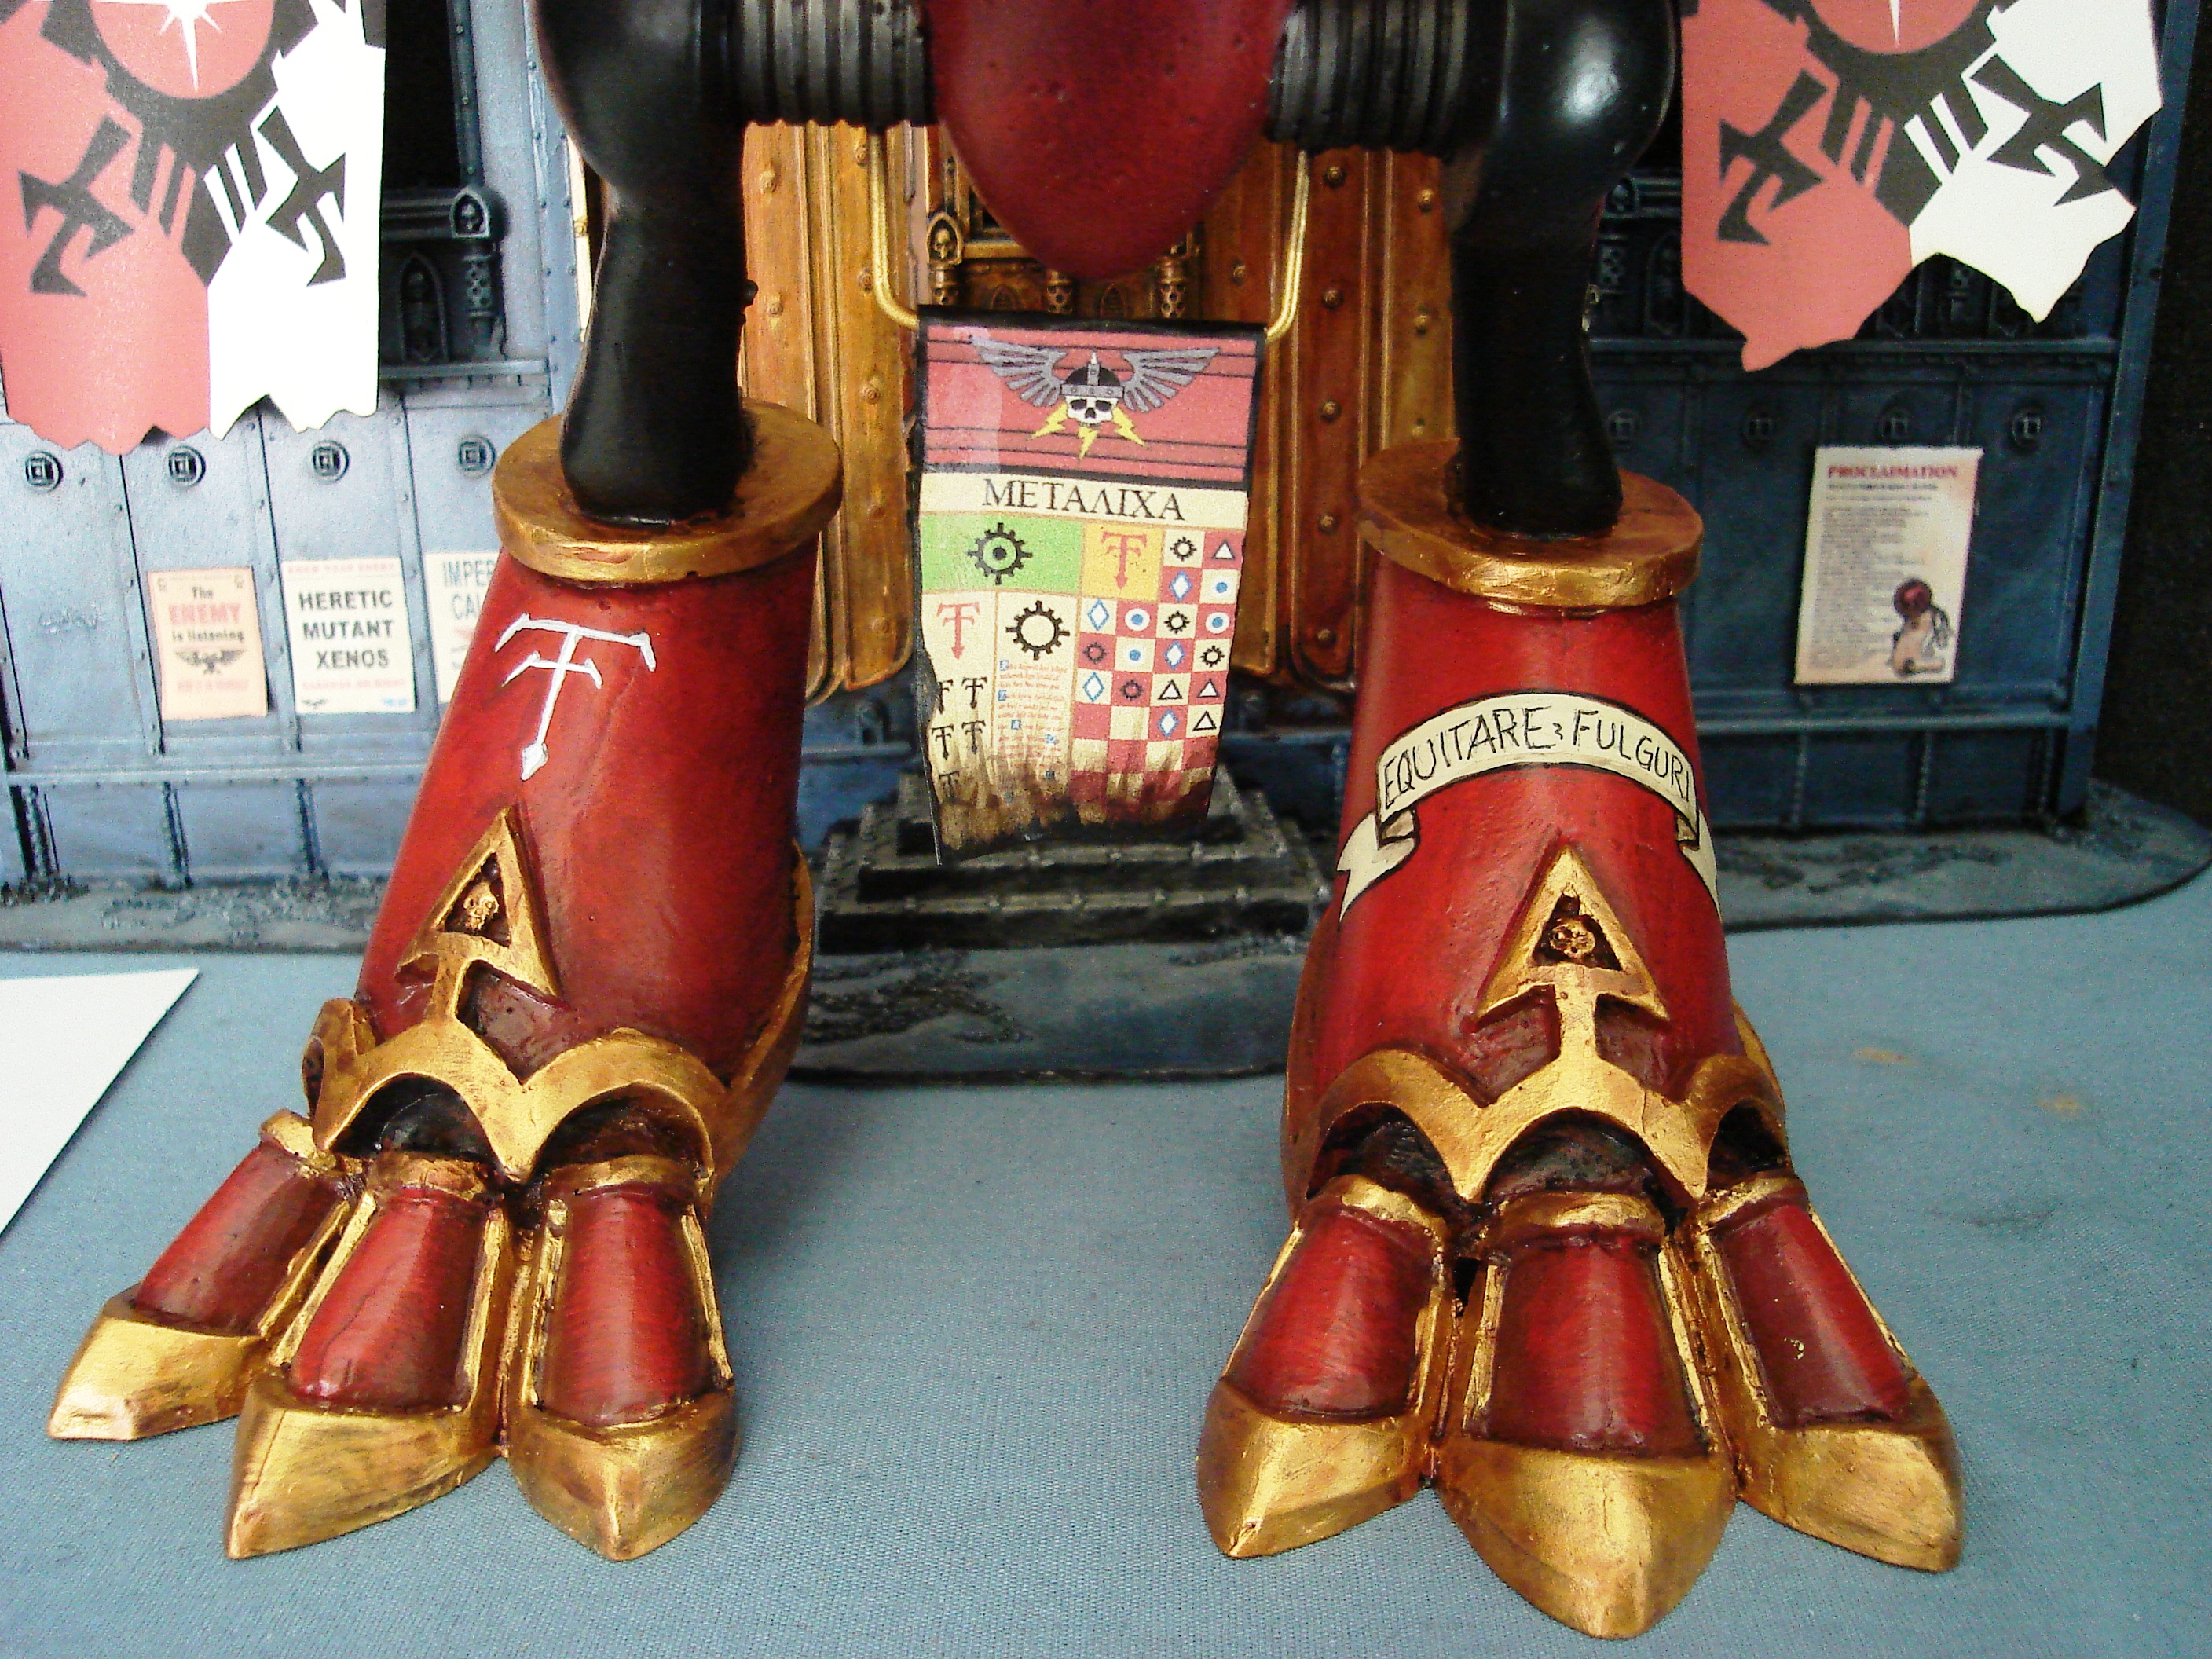
To represent the weathering and blood spatter, I went at the lower legs and feet with Chaos Black stippled on with a sponge, and similarly with Dark Flesh on the power claws. Then I went in and drybrushed Boltgun Metal over the black, and Red Gore over the Dark Flesh, leaving some of the darker colors in the recesses. I used some Blood Red sparingly on the extreme edges of the Red Gore, then used an old toothbrush to 'flick' some Blood Red spatters onto the model. In all cases I think I was a little too heavy-handed in my application - definitely a case of "less is more", and in the future I'll be more reserved about adding on the weathering and spatter.


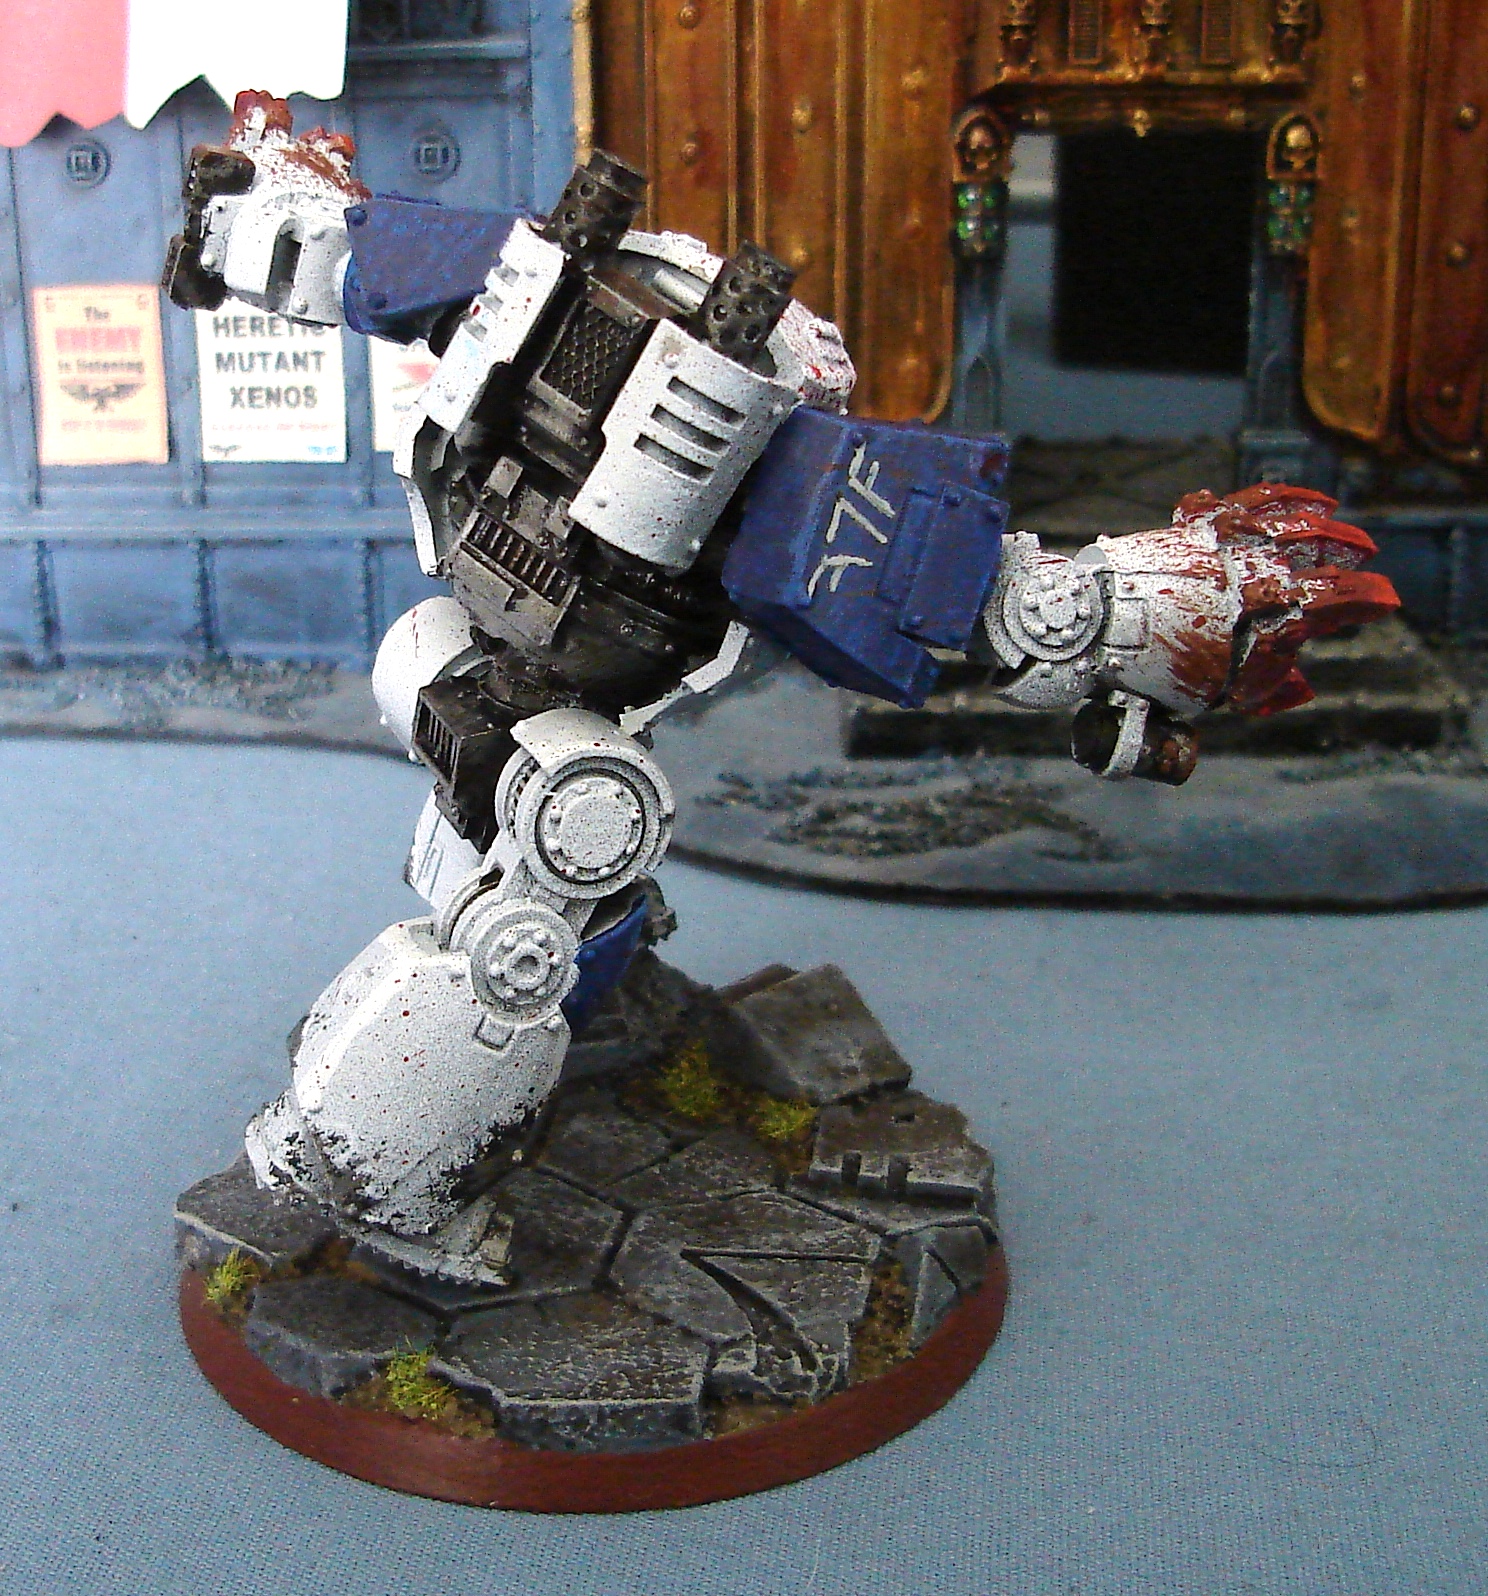
I also gave some thought to what company the World Eaters would be part of - The 8th company was led by Kharn, but I'm not planning on using him, so I settled on the 7th company. After all, I am Mordian 7th! Seemed appropriate. Heh. For the base I wanted something muted so I went with Shadow Grey on the rock and Graveyard Earth on the dirt. Over all of that I gave it a liberal application of Devlan Mud, followed by a drybrush of Stonewall Grey on the rock, and some tufts of static grass on the dirt.

All in all I'm about 85% pleased with how it turned out - learned a lot about the paint scheme and I'm looking forward to working on the rest of the army!

Monday, April 2, 2012

Heresy Era World Eaters - Painting the symbol

I started painting up the first test model for the World Eaters recently, and knew that I'd need to paint a fair number of the World Eaters symbols, as they tend to have them not only on their left shoulder pads, but also commonly on their left greave as well. Based on the awesome articles by Ron over at From The Warp about breaking down symbols into their constituent shapes, I thought I'd take a crack at it.


First thing was to scour the interwebs for some images of the World Eaters heresy era symbol - the one above seemed appropriate. Now I know my fine detail painting skills aren't quite up to the level of fidelity achieved in the picture above, so I simplified it somewhat, and took the advice of a friend of mine to alter the number of teeth in the top jaw as otherwise the teeth don't interlock as we felt they should.


Now bear in mind the steps listed are illustrated rather ham-handedly in MSPaint, but that makes for a decent replication of what I'm capable of with a paint brush when it comes to free-hand work. Steps 1 and 2 are drawing and filling in a trapezoid (or truncated cone) in black to form the backdrop against which the symbol is painted. Similarly a Camo Green circle is painted into the center of the trapezoid and filled in, such that it bulges out slightly from the sides of the trapezoid. After that, a series of squiggles are painted on using Enchanted Blue to form the basis of the continents on the planet.


Next, the blue is filled in to form the oceans. Step 7 is the beginning of the tooth pattern - Red Gore is used to draw the outside fangs (sloping to match the outline of the trapezoid), and a line is drawn straight up and down to form the points of the triangular teeth - One in the middle on the top, and two evenly spaced along the bottom, overlapping the planet somewhat. Steps 8 and 9 are connecting the points, and filling in the resultant triangles. Finally in step 10 the leading edges of the teeth are picked out in Blood Red to give it a little sense of depth. Note that I'll generally leave a little of the black trapezoid showing underneath the whole symbol, as that helps it 'pop' a little from the shoulder pad or greave that it is painted against.

Fairly simple, and I've utilized this method on the first test model which I finished this evening. Hopefully I can get some pictures of it in decent light over the next couple days to show how it works!